When you get up in the morning, what do you do?...do you...
Shower, get ready, get dressed and then go into the house to start your day...or
Do you go out into the house in your pj's or comfy clothes, have a cup of tea or coffee, something to eat, start the craziness with the family etc...
I am pajamas girl, but on work days I'm trying to shower and get ready first before I go down stairs. Seems like I'm more on time when I do.
How about you???
Have a great Thursday,
~Karen~

Thursday, June 30, 2011
Tuesday, June 28, 2011
Tool Time Tuesday...Washer Bracelet
Hi everyone!! So glad you've stopped by for another Tool Time Tuesday. This project is truly a "tool time" from the hardware store.
Today we are making this adorable bracelet (modeled by my daughter Kelsie!). Believe it or not, this bracelet is made from washers. It was fast and easy too. I think I made this in under 15 minutes.

Most hardware stores have a section in the nuts and bolts aisle where they sell these baggies. In Home Depot, these baggies are only 98 cents each.

There are many different styles of washers. These washers that look like flowers are called lock washers.

This package is a number 6. The smaller the number, the smaller the size of the washer. Each baggie has 20 washers in it for 98 cents. What a great price compared to a craft store for some jewelry supplies.

Here's what they look like out of the bag...

and here's a close up.

I also used jump rings to connect the washers, because the washers don't open up and need to be connected with something. I also used a lobster claw clasp.


First step is to use 2 needle nose pliers to carefully open up the jump ring.

I added one small washer and one large one.

Close up the ring.

Here are the 2 washers.

I kept on adding a jump ring and then alternated one large washer and one small washer until the bracelet fit my wrist.

On one end, I added the lobster claw clasp.

and at the other end, I added one jump ring to close with the clasp.

Very fast and easy.

and stylish too!
These would be great summer time craft projects for older children and great gifts too. Just think of the possibilities...earrings, necklaces etc. Add pretty beads in between for color too.
Remember our Tool Time promise...don't tell the hardware people we use these washers for craft projects or they'll raise the prices on us. Shhhhh...it's our little secret.
Have a wonderful Tuesday,
~Karen~
don't forget to pop over to my Sunday party post...Sew Darn Crafty. So many wonderful projects for you to just click on a visit! Lots of inspiration!
Sunday, June 26, 2011
Sew Darn Crafty Party...Week 20
Hello to all my wonderful friends out there in the world. Even though we've never met, I still consider you all my friends. We all go through the same things in life, we love to create, sew and craft and let's face...deep down we're pretty much all the same. If you're blogging or reading blogs, you love to be inspired and that's the basic truth of why we are "friends"...inspiration!
I feel like this opening paragraph each Sunday is to tell you what I've been up to this week. To make it short, my house looks like someone flipped it upside down. Remember I told you I want to switch out my daughter Courtney's twin bed for a queen, with some painting in there too? Well, my niece gave me a few pieces of furniture that she didn't want any more, (which I love, but just need to make room for) but that created a domino effect. Move something here to get something there, change this to fit that, why not clean this out since I'm here, why not clean out the closet and donate clothes.
This domino effect has reaked havoc on every single room in the house. EVERY. SINGLE. ROOM. We are stepping over piles of clothes, pieces of furniture, bags of I don't know what...but I LOVE IT. Gives me a sense of cleansing, getting rid of things we just don't need, minimizing my life. It may be upside down right now, but when it's done Woo Hoo!!
So now let's see what you've been up to...

Sew Darn Crafty is all about YOU!! Show off your projects, share a tutorial, show us your vacation pictures, share a family favorite recipe...share anything. Not only does linking inspire us all, it also brings lots of new people to your blog for a visit. Click here for past parties and lots of inspiration
Easy steps to join in on the fun...
- link up to the specific project post, not your whole blog. Makes it easier to link right to that post and not search through all your whole blog. To find the http address to a specific post, just click on the Title of your post.
- link as many projects as you'd like...old or new
- anything goes...cooking, sewing, knitting, crafts, organizing, remodeling projects etc...
- visit other links to share some blogging love! You know we all love comments!
- grab a Sew Darn Crafty button for your blog (on my right side bar) or just link to the party in your post.
- the more we share, the more people will join and then there's more inspiration to look at!
- linking is open til Saturday night, so plenty of time to join in
- just click the "click here to enter" button and follow the easy steps
Have fun linking up! Don't forget to come back and take a look at all the great projects during the week,
~Karen~
Tuesday, June 21, 2011
Tool Time Tuesday...Recycled Pizza Box Support
I haven't had a recycling Tool Time in a while. You know I always look at something twice before I throw it out and then stuff it in my purse or store it away for a project. Sad, I know...I think I need some sort of garbage counseling LOL!!
Well, here is one of those items.
Do you know what these are?

They look like doll house tables...but they are those little plastic pizza thingies that you find in the middle of the pizza so the cover doesn't end up squished on top of the pizza. Not sure of the name, but maybe pizza protector or pizza box support.

They're only 1 1/2 inches high and 1 1/2 inches wide. Tiny little things, but I have big plans for them.

How about drying supports for craft projects.

Paint something on both side and place it on this support, so it can dry all over at the same time.


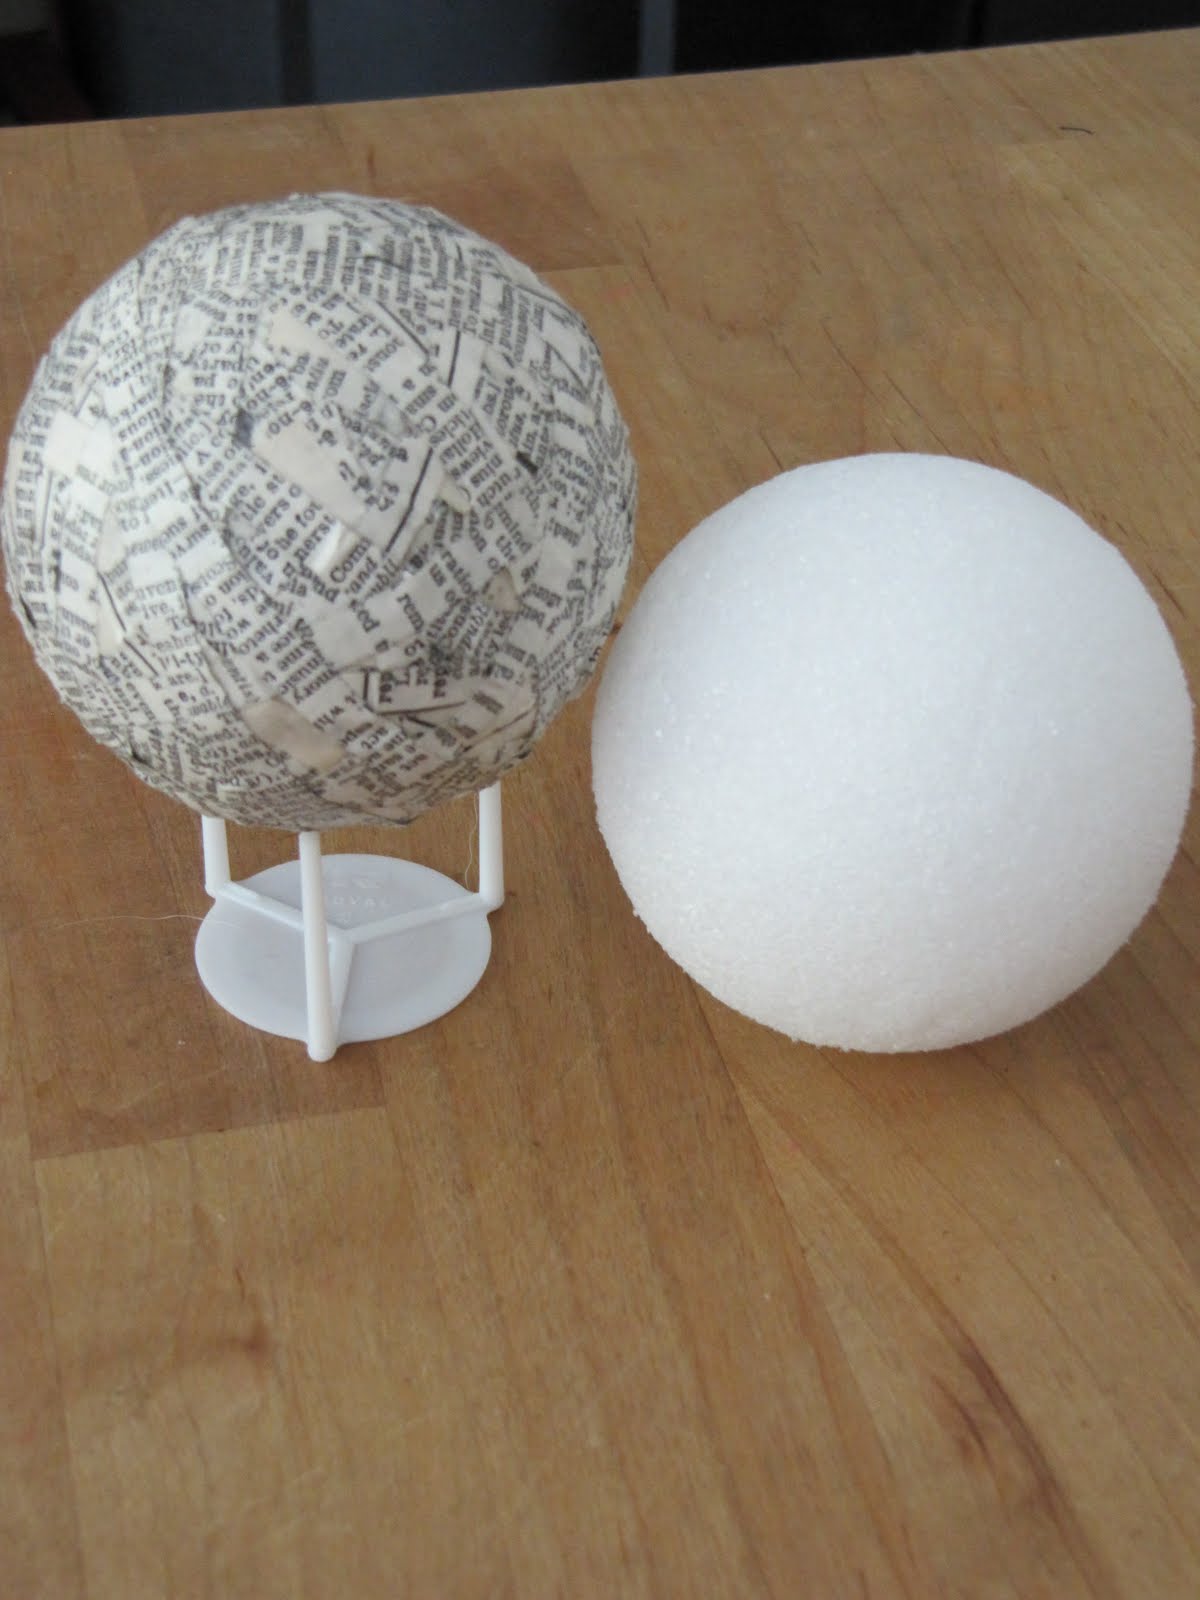
Another drying support especially when using glue or Mod Podge. I made these balls with shredded old book pages. Can't let the glue dry right there on the table, because it would glue itself right to the surface. These supports are plastic, so nothing really sticks to the little spikes and the air circulates all around.
How about gluing these to some kind of sewing station and have all your hand sewing thread right there where you are working. You could some how fashion an area for a pincushion, thread and scissor holder, then glue this plastic thingy to that to hold the thread.


This one is a little crazy, but worked great with my iPhone.

Great for watching videos, or having the phone up so that I can see texts or emails coming in without having to tip the phone to see...especially if I'm working at my desk and the phone is flat on the table. This keeps it in plain view.


If you can think of other things to do with these crazy little things that I hate to throw away...let us know in the comments section. There must be something else we can do with them!!
Oh wait...I just thought of another one, but sorry no picture...just brain storming. A place card holder for the dinner table or when you are labeling food on a buffet!
Keep thinking and eating pizza...we need those support thingies!
Happy Tuesday,
~Karen~
Sunday, June 19, 2011
Sew Darn Crafty Party...Week 19
Happy Father's Day to my wonderful husband and to all the fathers out there...not that there are any men who read this blog besides my husband. Maybe you can pass the wishes on to them! Since 99.9999% of my readers are women, lets say Happy Sew Darn Crafty Day...just don't tell all the dads out there!
So show me what you've been up to this past week or any time for that matter...you know we have to sneak our crafting time in when ever we can get it!

Sew Darn Crafty is all about YOU!! Show off your projects, share a tutorial, show us your vacation pictures, share a family favorite recipe...share anything. Not only does linking inspire us all, it also brings lots of new people to your blog for a visit. Click here for past parties and lots of inspiration
Easy steps to join in on the fun...
- link up to the specific project post, not your whole blog. Makes it easier to link right to that post and not search through all your whole blog. To find the http address to a specific post, just click on the Title of your post.
- link as many projects as you'd like...old or new
- anything goes...cooking, sewing, knitting, crafts, organizing, remodeling projects etc...
- visit other links to share some blogging love! You know we all love comments!
- grab a Sew Darn Crafty button for your blog (on my right side bar) or just link to the party in your post.
- the more we share, the more people will join and then there's more inspiration to look at!
- linking is open til Saturday night, so plenty of time to join in
- just click the "click here to enter" button and follow the easy steps
Have fun linking up! Don't forget to come back and take a look at all the great projects during the week,
~Karen~
Thursday, June 16, 2011
Thoughts on Thursdays...
Ok...by the toilet paper controversy from last Thursday, I see you like the question of "this or that". Maybe I should call it "This or That Thursday", so here it is...
Your hobby time...do you do your best work in the morning or at night or any time you can get it?
I'm a night!
Happy this or that,
~Karen~
Your hobby time...do you do your best work in the morning or at night or any time you can get it?
I'm a night!
Happy this or that,
~Karen~
Tuesday, June 14, 2011
Tool Time Tuesday...Kitchen Sponge Pincushion
Happy Tuesday! How would you like to make an adorable pincushion for 25 cents or less with scraps and a kitchen sponge?
You read it right...a kitchen sponge. Use a new one of course, because that would be gross if we didn't...LOL
Isn't she pretty? These would make great gifts for sewing friends for swaps, guilds, quilting bees, holidays etc

Monday, June 13, 2011
Blog Buddy...How To Add A Button To Your Blog

Welcome to another edition of Blog Buddy...the place to find helpful tips and tricks for your blog. I am not an expert, by any means, but I have learned a lot along the way (especially by making mistakes!)
I've had soooo many emails asking how to add a button to a blog. So today I thought I would show you how to "Grab a Button" from another blog to add to your side bar or to a post. You know I love pictures and they are worth a thousand words, so here are 17 pictures to show you a quick and easy process.
First, find the button you'd like to have on your blog. Some will have "the code" underneath and some will not. Let's start with the code.
Click any picture below to enlarge...
These 2 buttons on my blog, that are circled in the picture, have the code.

Sunday, June 12, 2011
Sew Darn Crafty Party...Week 18
It's Sew Darn Crafty Sunday...Sew, for anything sewing...Darn, for anything knitting and Crafty, well, that's just every thing else we do in life. I think we all have to be crafty these days to turn "ok" things into GREAT things. SDC is the start of a week long linking party to share the most wonderful projects, ideas, tips, vacations, dinner/desserts recipes etc.
This week, my project is to get my oldest daughter's room pulled apart to switch out a twin bed to a queen bed and paint the room too. However, a ton of college stuff still packed in boxes and an explosion of clothes is keeping me from it. I'm doing the prep work in the basement...painting the queen bed frame, getting other furniture ready and trying to move things out. This is my SDC project this week...we'll see how far I get and then I'll share it with you.
So let's see what you were up to last week...and don't forget to take pictures of projects you do this week, so you can link up next Sunday too!

Sew Darn Crafty is all about YOU!! Show off your projects, share a tutorial, show us your vacation pictures, share a family favorite recipe...share anything. Not only does linking inspire us all, it also brings lots of new people to your blog for a visit. Click here for past parties and lots of inspiration
Easy steps to join in on the fun...
- link up to the specific project post, not your whole blog. Makes it easier to link right to that post and not search through all your whole blog. To find the http address to a specific post, just click on the Title of your post.
- link as many projects as you'd like...old or new
- anything goes...cooking, sewing, knitting, crafts, organizing, remodeling projects etc...
- visit other links to share some blogging love! You know we all love comments!
- grab a Sew Darn Crafty button for your blog (on my right side bar) or just link to the party in your post.
- the more we share, the more people will join and then there's more inspiration to look at!
- linking is open til Saturday night, so plenty of time to join in
- just click the "click here to enter" button and follow the easy steps
Have fun linking up! Don't forget to come back and take a look at all the great projects during the week,
~Karen~
Thursday, June 9, 2011
Thoughts on Thursdays...
Toilet paper on the dispenser...is the paper over from the top or from under? Mine has to be over! Has to be.
You???
You know "Thoughts on Thursday" can be about any thing...crazy or not!
Have a great Thursday,
~Karen~
You???
You know "Thoughts on Thursday" can be about any thing...crazy or not!
Have a great Thursday,
~Karen~
Wednesday, June 8, 2011
Come Take a Peek For a Wonderful Cause...
Hello all my blogging friends! Thought I would share a wonderful project that Carlee is hosting over at her blog...Ladybird Ln.
Starting next week on June 15th through the 22nd, Carlee is hosting a pillow contest for a wonderful cause. Carlee has a great friend, Malynn, who is 14 years old and has gone through some very tough medical problems. Even though Malynn has had problems of her own, she is still thinking of others. Malynn has a goal to donate 100 pillowcases to the Primary Children's Hospital. Amazing!
Here's where Carlee's Pillow Fight For a Cause comes in. From June 15th - 22nd, you can link up your best pillow project that you have done in the past to the linking party. All who link up a pillow project will be entered to win some fabulous prizes.
However, to enter the Pillow Linking Party for the chance to win the prizes that week, you MUST donate a pillowcase to charity. They have a great tutorial on her blog so you can make a bright and cheery pillowcase to send. The pillowcase can be donated to your local children's hospital or charity or you can send it to Carlee to help Malynn's goal.
This is only a small desciption of the fun over at Ladybird Ln, so pop over there to read ALL the details
Click here or any red link on this post to read all about.
Thanks in advance for helping Carlee and Malynn to reach their goal and to have a successful Pillow Party!!
~Karen~

Tuesday, June 7, 2011
Tool Time Tuesday...Recycling Candle Jar Tops
It's Tuesday and that means Tool Time, but today's post is also a recycling project. Jar candles are pretty pricey, so why not use every part of the candle and the jar. See the end of the post for links to other posts I've done on recycling candle jars.
Here is a large jar with the top on and some extra tops I've started to save.

Monday, June 6, 2011
WANTED...Red and White Fabric Swappers
Thanks for all your help...I'm all set for swappers now! Wow, that was fast. If I have any more slots opening up in the next week...I'll do a shout out up again. THANKS

I have a few extra spots for my Red and White, 5 inch square fabric swap...
Qualifications for this last minute job offer job (lol):
- must live in the US, due to mailing issues
- must love red and white fabric
- must like to cut 125 - 5 inch squares fast! Due date is June 15th
- leave comment on this post
- must have email address in the comment
- first come first serve in the comment section...if you have an email address.
Click here for main swap details
Click here for mailing post.
Click here for all posts for the swap.
I will email you to let you know if you are in!
Take care,
~Karen~
Sunday, June 5, 2011
Sew Darn Crafty Party...Week 17

It's a beautiful Sunday morning. It's been a crazy week here at Sew Many Ways, but I'm hoping to get some projects done today...I hope!! You know how that goes...the best laid plans. Maybe I shouldn't make lists. It seems I really never get all the things checked off. Too many projects floating through my head, that's why.
Speaking of projects...what have all of you been up to? I just love looking through the links you post each week. Amazing all the talent out there in this world! Inspiration every where. So let's get the party started!!
Sew Darn Crafty is all about YOU!! Show off your projects, share a tutorial, show us your vacation pictures, share a family favorite recipe...share anything. Not only does linking inspire us all, it also brings lots of new people to your blog for a visit. Click here for past parties and lots of inspiration
Easy steps to join in on the fun...
- link up to the specific project post, not your whole blog. Makes it easier to link right to that post and not search through all your whole blog. To find the http address to a specific post, just click on the Title of your post.
- link as many projects as you'd like...old or new
- anything goes...cooking, sewing, knitting, crafts, organizing, remodeling projects etc...
- visit other links to share some blogging love! You know we all love comments!
- grab a Sew Darn Crafty button for your blog (on my right side bar) or just link to the party in your post.
- the more we share, the more people will join and then there's more inspiration to look at!
- linking is open til Saturday night, so plenty of time to join in
- just click the "click here to enter" button and follow the easy steps
Have fun linking up! Don't forget to come back and take a look at all the great projects during the week,
~Karen~
Thursday, June 2, 2011
Thoughts on Thursdays...
Do something every day that makes you happy...kiss the ones you love, sew a little, have a cup of tea, paint your nails. Just do one little thing!
Have a great day,
~Karen~
Have a great day,
~Karen~
Subscribe to:
Posts (Atom)