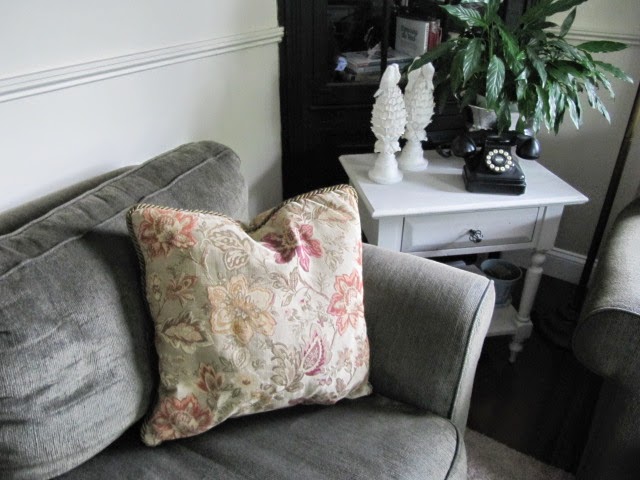
Need a little quick change for your seasonal decor, but don't want to spend a lot of money? Freshen up a room with new pillows. I've had the same pillows on our couches for a while. I still love them, but they have more of a fall color scheme. I really wanted a brighter look for spring and summer, but it is difficult to find color to match a dark sage green living room set.
Here's the before of the couch and pillow. We can't afford to change out the furniture either, so new pillows it is!
Here's the after. I added a few blue accents to match the new pillows and I'm done!!
Come on in to see how easy they are to make using a tablecloth!!
Showing posts with label tablecloth redo. Show all posts
Saturday, May 24, 2014
Wednesday, February 16, 2011
How To Hand Sew Invisible Stitch For Decorative Pillows...
I'm back again...I just did a post on how I turned this sale tablecloth into 3 pillows and a tote bag.

Here's the pillow, but I also wanted to show you how to close up the opening on the bottom with an invisible stitch.

Here is the opening on the bottom of the pillow...pinned along the way.

Take your needle with a single knotted thread and bring the thread through towards you, so the knot is on the inside of the layer closest to you. Seen here in the picture below.

Now take your needle and bring it through the fabric right across from where the thread is coming out on the other side. (I hope this makes sense..hard to explain in written form)

Keep the needle inside the fabric under the fold for about 1/4" to 1/2" and then poke it out a little from the fold. See the tip of the needle coming out?

Now bring the point of the needle towards you and grab a little bit of fabric from the fold of the other side closest to you.

Pull snug. Now you do the same thing again.

Here's the pillow, but I also wanted to show you how to close up the opening on the bottom with an invisible stitch.

Here is the opening on the bottom of the pillow...pinned along the way.

Take your needle with a single knotted thread and bring the thread through towards you, so the knot is on the inside of the layer closest to you. Seen here in the picture below.

Now take your needle and bring it through the fabric right across from where the thread is coming out on the other side. (I hope this makes sense..hard to explain in written form)

Keep the needle inside the fabric under the fold for about 1/4" to 1/2" and then poke it out a little from the fold. See the tip of the needle coming out?

Now bring the point of the needle towards you and grab a little bit of fabric from the fold of the other side closest to you.

Pull snug. Now you do the same thing again.
Target Tablecloth Update...
Remember my Target sale items I told you about last week? Well, I worked on the tablecloth today. One 70 inch round, linen tablecloth yielded three 18 inch pillows, a lined tote bag and I still have scraps left over to make some coasters, eye glass case and another small bag.

All that for $3.74...not bad!

I made three of these pillows. Two for the couch and one for the chair.


Here's the tote bag. The tablecloth was almost like duct cloth, so very sturdy for a bag. If you want to make one for yourself, I used my eye glass case tutorial. I just cut larger pieces of fabric the size I wanted and added the handles on each of the short ends of the fabric. Click here for the eye glass case tutorial.

I lined it with muslin.

The bag was a quick sew and I used every piece of the tablecloth...even the hem.

I cut them hem off close to the seam and used that for the handles. There is the raw edge, but I'm just using this to carry my books or magazines in the car.

I put together a short tutorial on hand sewing a blind hem on the pillow I made...or at least what I call a blind hem.

All that for $3.74...not bad!

I made three of these pillows. Two for the couch and one for the chair.


Here's the tote bag. The tablecloth was almost like duct cloth, so very sturdy for a bag. If you want to make one for yourself, I used my eye glass case tutorial. I just cut larger pieces of fabric the size I wanted and added the handles on each of the short ends of the fabric. Click here for the eye glass case tutorial.

I lined it with muslin.

The bag was a quick sew and I used every piece of the tablecloth...even the hem.

I cut them hem off close to the seam and used that for the handles. There is the raw edge, but I'm just using this to carry my books or magazines in the car.

I put together a short tutorial on hand sewing a blind hem on the pillow I made...or at least what I call a blind hem.
space
I'll be right back with tha tutorial,
~Karen~
Subscribe to:
Posts (Atom)