

A few blogging friends have emailed me asking how I capture a picture image of my computer screen and then get that image into a blog post. The answer is "Print Screen".
Print Screen is a button on your computer that allows you to capture the current image on your screen then save it to your computer. I use Windows, so it may be different for Mac or other computers, but check your computer manual.
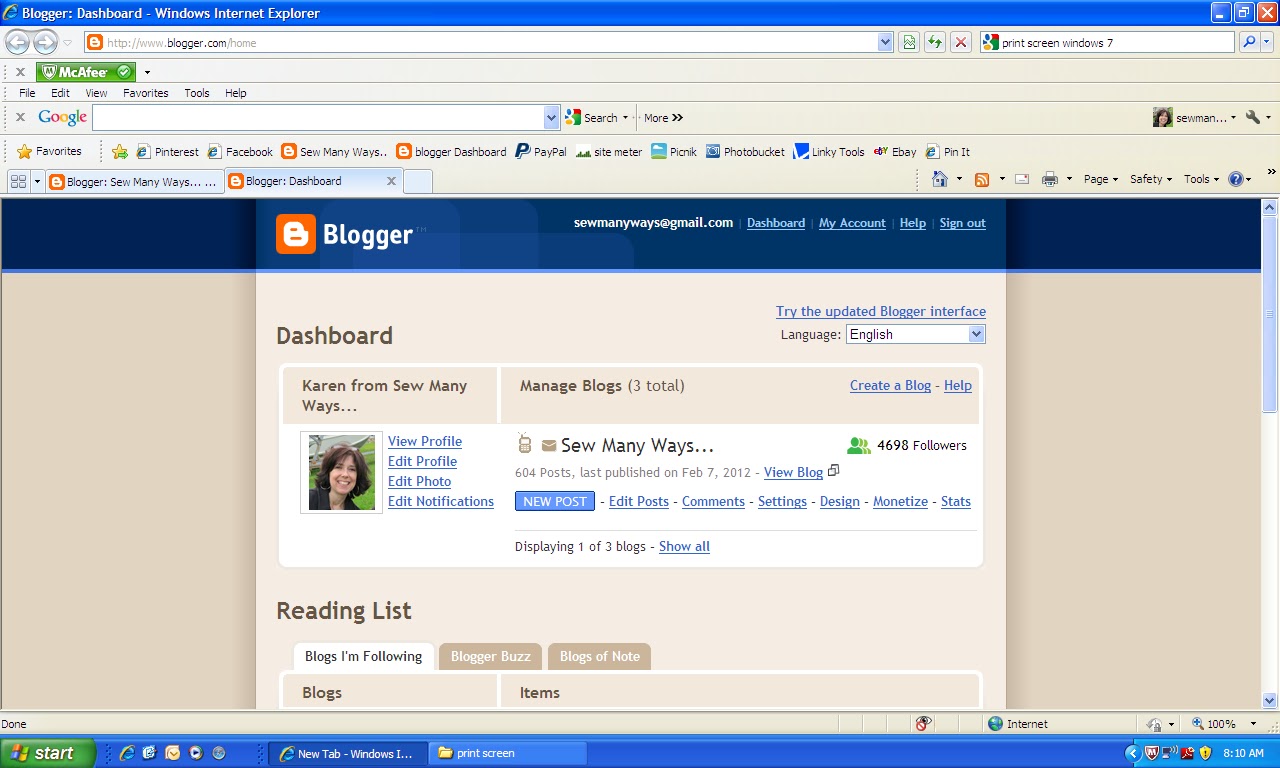
Here is a screen print of my dashboard as an example. This feature helps me in my Blog Buddy (blogging tips) posts. I screen print the steps on how to do things with your blog. I think it's much easier to learn something new with images than with just words.
This is a picture of my own key board. The Print Screen button is up there at the top...above the "insert" "home" buttons.

Mine says "Screen Print", but yours could say...Prt Scr, Print Scrn, Prt Scn, Prt Sc, Prt Scrn, or Prnt Scrn

When you have the page up that you want to capture, just simply push the "Print Screen" button. Now, if you want to use that image in a blog post, you have to get that image to your computer to save it.
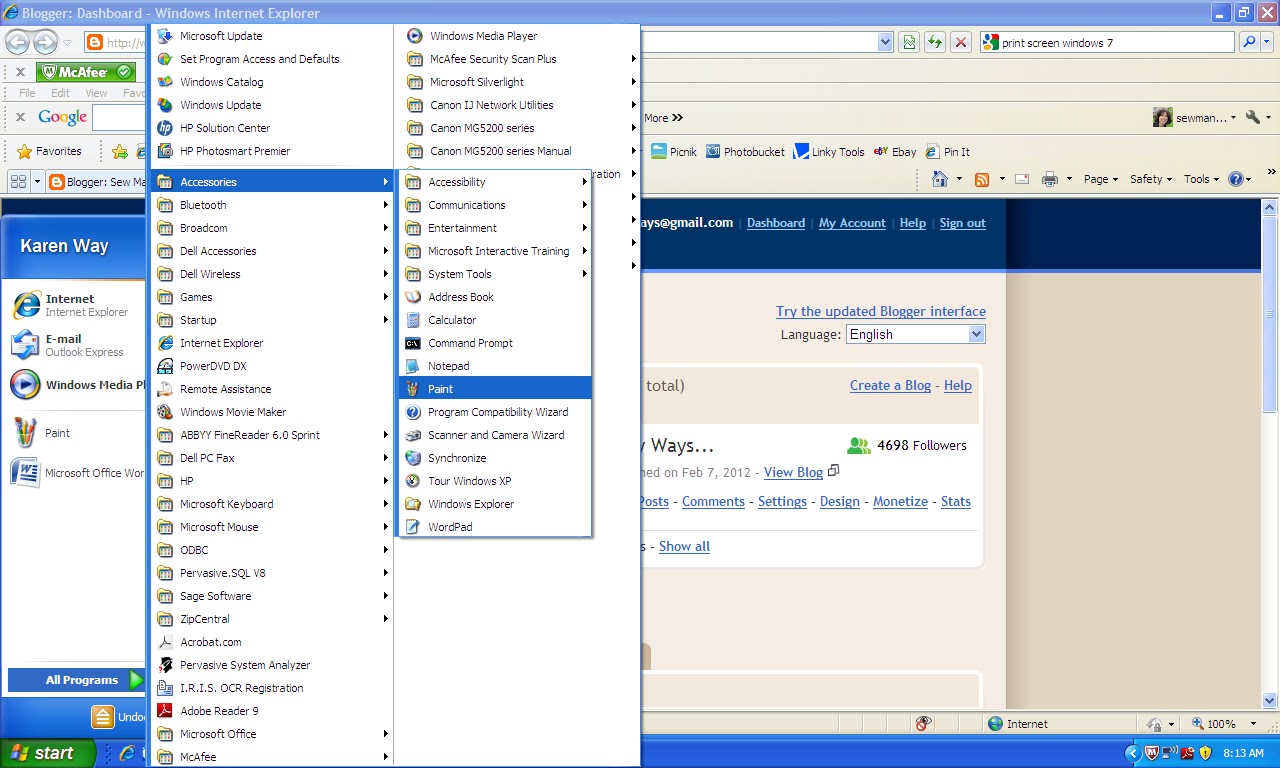
With Windows, I use Paint...
- go to the "START" button on the bottom left of your computer screen
- then ALL PROGRAMS
- then ACCESSORIES
- then PAINT
This is what PAINT looks like. You can edit pictures, write on them or use the spray painting features to circle things for instructions or to point things out. You can change the ink color of the design too down on the bottom left.

To get the print screen image on paint...
- click "EDIT"
- then click "PASTE"

Here's the screen print that I did of my dashboard.

Here are some painting things you can do with the features. I always use the spray can to circle things for instructions. If you make a mistake when drawing on the picture, just click "EDIT" then "UNDO"...I know that button really well... LOL

Now to get the finished image to your computer so you can get it on your blog...
- Go to the "FILE" button on the upper left corner
- click "SAVE AS"

Now the window will pop up where I save my images to in "MY PICTURES". (you can save them to where ever you save your pictures) Add a name and image number and click "SAVE". I usually have a file open and add several images for a post, so make sure you are numbering them in order. Makes it easier for me when I'm doing the blog post.
For example...I named these images print screen 001, print screen 002 etc. They will be in the file in the order I want them to be in my blog post.

Bloggers can also use Print Screen when you have Give Away posts. When you use the Random Number Generator to select the winner, screen print the image of the winning number to add it to your give away post.
I am definitely not an expert, but learn as I go with the help from family and friends...especially my daughters. Thanks girlies!! Try, experiment and learn as you go too. When you learn new things, it opens up a world of possibilities.
Have fun print screening,
~Karen~

I did it!!! Thank you sooo much!!
ReplyDeleteWhat a great post! I was wondering how to do this just yesterday, and today, here's the answer. It's funny how that happens sometimes! Thanks.
ReplyDeleteHave often wondered how people do this! Thanks, I'll have to give it try one of these days. I must save this post for future reference! I love you techy people that share!
ReplyDeleteWow, Thank you!!
ReplyDeleteI'm at work now, but I'm going to try this tonight!
OMG - you are WONDERFUL!!!!
ReplyDeleteThanks for all of the Helpful Hints & Tips :)
Cool...thanks!!!
ReplyDeleteI was one of the those who asked - thank you!
ReplyDeleteThank you so much. This post was very helpful and I never thought about putting it in paint.
ReplyDeleteTHANK YOU!!! I knew about the print screen button, but had no idea what to do after that!!!
ReplyDeleteOn a MAC, you click command-shft 3 for a Print screen. You can also do command shft 4 - you then get a cross hair that you spread around just the item on the screen that you want to save. Very practical if you just want one a picture and not all the personal stuff at the top...
ReplyDeleteBy the way, I love your blog. You are a very creative Lady!
Louise C
Montreal
thanks for the tips. I'm always looking for ways to do things on the blog. What I would like to know is how to resize more than one picture at a time to put on the blog. It takes me so long to do each one individually. Well, have a good day/night. Whatever. Linda
ReplyDeletehttp://twosucculentsisters.blogspot.com/
I use this feature at work all the time, if you only want to print one of the windows you have up, hit alt + print screen and then you just get the highlighted window instead of the whole screen.
ReplyDeleteThat was Great!
ReplyDeleteI never even noticed that button and always wondered how everyone saved their images. Thank you so much!
ReplyDeleteThis is SO helpful! I didn't know I had the "Paint" feature in my accessories and that was the missing link in the process for me. Thank you thank you!
ReplyDeleteThanks so much. I read this when you first posted it and didn't think I would ever need it. So glad to know it was here when I did. Also didn't know I had "Paint". Had to do a bit of searching, but found it. Thanks again.
ReplyDeleteI just want to thank you so much for all your blogging tips. I needed to learn how to print a screen shot from my computer and knew exactly where to go to find that info. Please continue this wonderful and helpful tips. Thanks again.
ReplyDeletethank u <3
ReplyDelete