Happy Tuesday everyone!! I know we just finished Halloween, but it's never to early to start thinking about little Christmas gift projects.
Here's a super quick idea to make ahead and have on hand.
Hot Cocoa Christmas Tree!!
Most of you know my love for these little take out containers. I use them for storing small crafting items and anything else you can think of. Click here for a very popular post using them!!
I bought a package of 250 at a party store, but before I knew I could buy them, I collected them from our Chinese take dinners or from the ketchup at McDonald's or other similar restaurants.
They come in different sizes, so this is what I was experimenting with when the Hot Cocoa Christmas Tree idea popped in my head.
All you need are hot cocoa packets, marshmallows or fluff and some kind of chocolate....Hershey bars broken up, chocolate chips, chocolate sprinkles or Hershey Kisses.
Empty the cocoa packets into the larger container, marshmallows in the medium and the chocolate in the small. However, if you LOVE chocolate...the chips could always go in the larger size!!
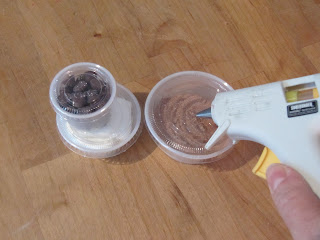
Put a cover on each container. I added a dab of hot glue to the cover and then put the next size on...just to keep the containers stacked in the packaging.
I used low temp hot glue so it wouldn't melt the plastic. (wait..."low" temp "hot" glue, why do they call it that?!? lol
All set to decorate as you'd like. I thought I would add a little star to the top.
Print out a free printable star template from the computer. You need 2 to make a double sided star. I printed it on card stock for a sturdier paper.
Take one star and place a tooth pick on the center and spread with glue.
Top it with the second star and press until dries.
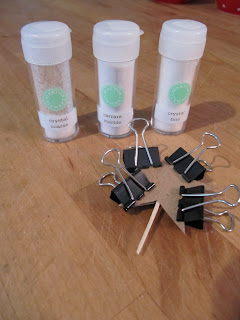
I used paper clamps to hold in place...hands free. Also, get your glitter ready!
Coat the outside of the star with glue again and sprinkle with glitter.
While that's drying, poke a small hole in the cover of the top container. This hole will be for the tooth pick.
Here is the star with one coat of glitter and edged with a line of glue.
Add more glitter.
This is the dried star. The extra edge of glue and glitter on the border sort of frames the star.
The picture doesn't really show how sparkly this is.
Place inside a cellophane bag and add a big bow.
I completely for forgot to add a hang tag and it's almost midnight and my sewing room is too dark to take a nice picture.
The hang tag should have a title with a little bit of instructions on how to make the cocoa.! You could even add a mug and spoon too!
Maybe if I'm inspired with a poem for the hang tag I'll share it with you.
It's November 1st, so there's still time to start saving those little cups. The ones I purchased are made by Solo.
Have a great Tuesday,
~Karen~


Oh Karen, that is such a novel idea. Wouldn't they make neat gifts for teachers, etc? I love your ideas, never miss them, and believe it or not, I have used quite a few of them..lolo
ReplyDeleteJean
This is a really cute idea--I think I may make a few of these to hand out as party favors!
ReplyDeleteAwesome idea! It could be VERY versatile! Thanks so much for sharing!!
ReplyDeleteWhat a terrific idea for really cute, inexpensive gifts for teachers, friends, party favors. . .
ReplyDeleteWhat a great idea Karen!!!
ReplyDeleteThis is a great idea, hope I don't forget it by gift giving time.
ReplyDeleteI think the cup/tree presentation is great for a collection of any little things! :) very cute
ReplyDeleteI love it :) Am just trying to figure out a way to make the stick for the star into a chocolate covered candy cane stir stick and get it to stay in place! Maybe frosting instead of the glue gun??? gotta try it ;)
ReplyDeleteWhat a great gift idea! Easy and cute!!
ReplyDeleteNow this would be cute as a guild gift wouldn't it!!!
ReplyDeleteI never (ahem, uh, hmmm) I really don't like to collect to much - of the type of things food comes in.... I used to alot, okay!!! But I never knew what to do with them, so they become that dreaded word "CLUTTER"!!!! With your inspiring ideas and the fact that you DO them - now I know what to do with the fun looking things I find!!! Keep 'em safe till I see what you did!!!! ;-)
what a lovely idea.
ReplyDeleteThis comment has been removed by a blog administrator.
ReplyDeletewow Ms Karen, I didn't know thats what that meant! I figured since name EW was blue, all was good :) Thank you for letting me know and for the tut! All is fixed now :D
ReplyDeleteOh my, aren't you just the most cleverest! That is such a cute idea. Thanks for sharing.
ReplyDelete:) CAS
Adorable and such a great gift idea1
ReplyDeleteI just found your blog through a pin on pinterest..I have read several of your posts..and look forward to reading more...great blog...
ReplyDeleteI just found your blog and I think I love you! I love your recycling/re-purposing stuff the best! I wonder how I could reuse stuff all the time but never follow thru. You do what I would LOVE to do! Oh.my.word... love this blog!!!! Talk about being inspired!!!
ReplyDeleteI've just joined but wanted to say love your blog. I'm going to be making these as teacher Xmas gifts this year - absolutely brilliant!
ReplyDelete