
Here's a picture heavy tutorial on how to machine sew hexagons. This works for any size hexagon. I made a Grandmother's Flower Garden pillow in this tutorial, but you could just plan out your hexagons in any pattern and sew it into a quilt top, just need to trim the sides off.
Cut your desired size hexagons...this is the large hexagon from the accuquilt cutter die. From flat side to flat side it's about 4 1/2" wide. From point to point it's about 5" wide.

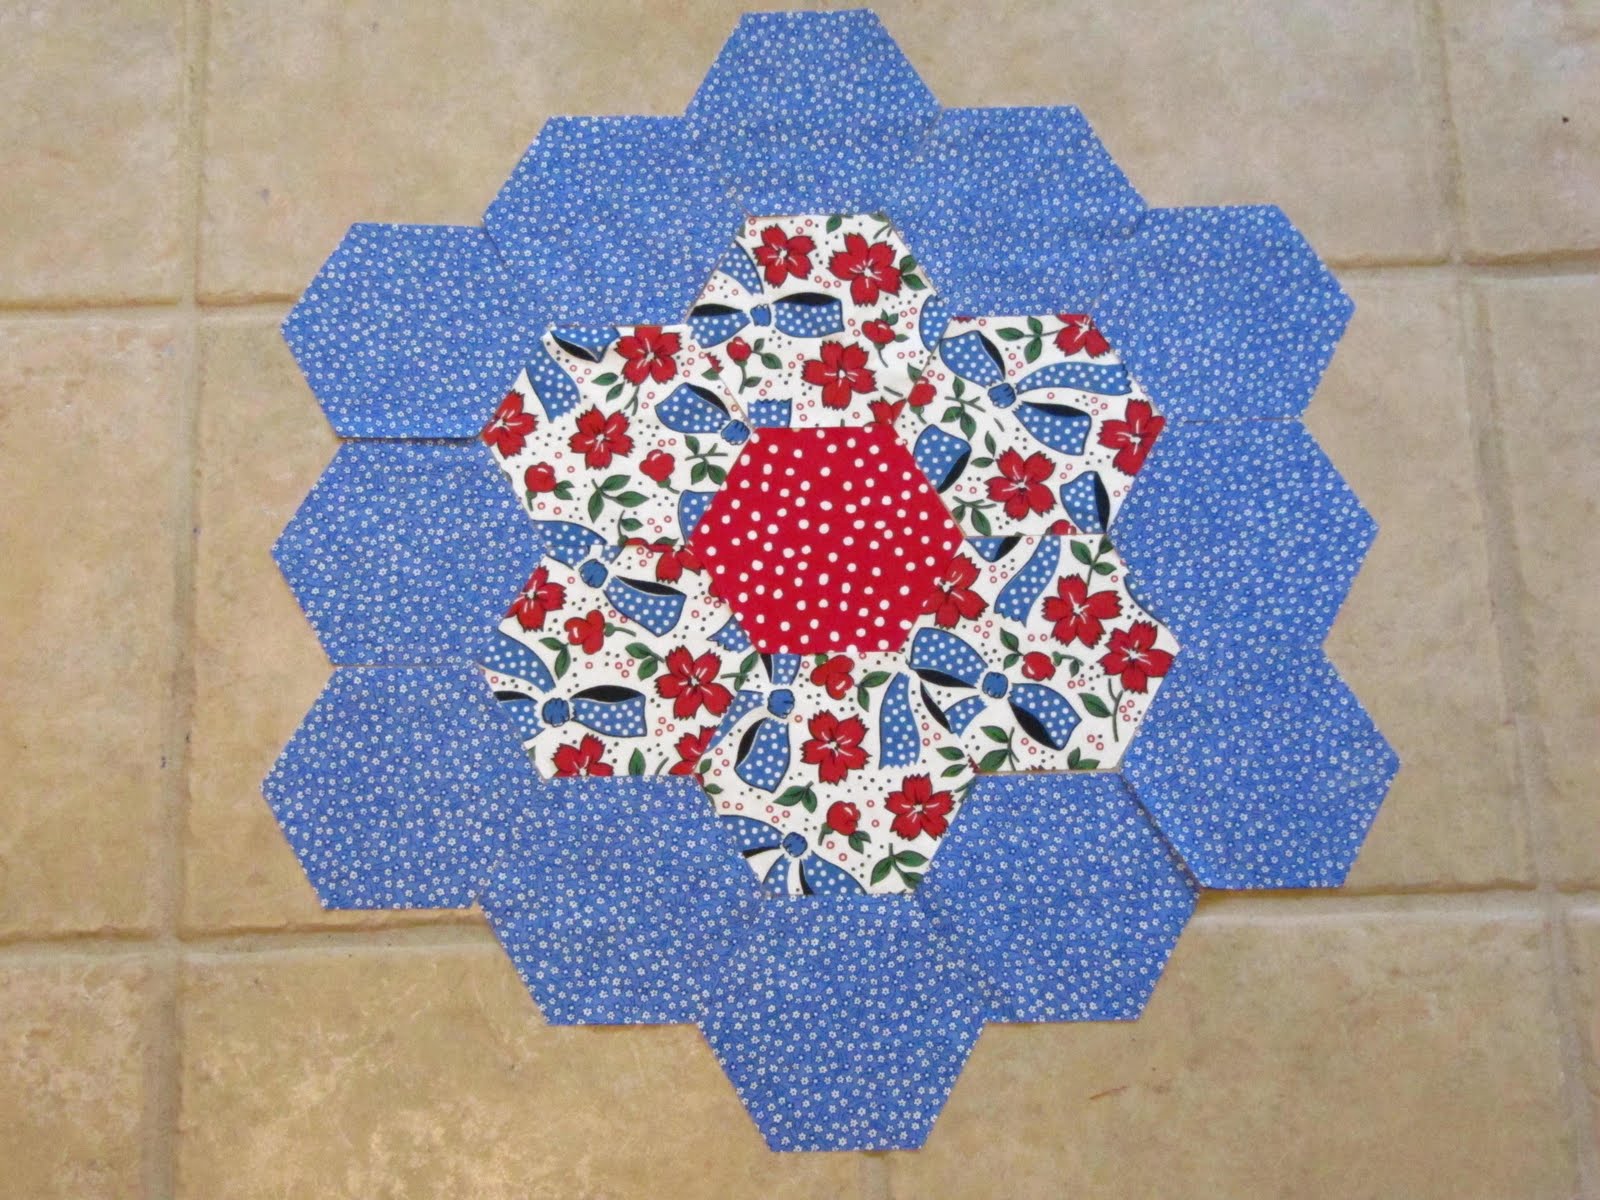
Arrange your hexies in the desired pattern. You could do an all over random pattern, a hexie charm quilt or little flowers all over. It's all up to you! This design, unsewn, is about 17" across.

This next step is crucial to the ease of machine sewing the hexies together. It gets rid of those dreaded dog ears and you don't have to guess how to match up the seams.
The first step is to trace your hexagon onto card stock or something sturdy and cut it out. You will only need one.

Now take a quilt ruler and place the edge of the card stock hexie on the 1/4" line.

Draw a pencil line.

Do this all the way around the paper hexagon.

Place your ruler, horizontally from point to point as seen below.

That's the red line below.

Cut the hexagon in half on that red line. You now have 2 templates. You only need one, so you can share the other with a friend!

See that little triangle I'm pointing to in the upper left hand corner of the half hexie?

You need to trim that off.

On both corners. This is the most important part!

The rest of the lines don't mean anything, we just marked them all to get the 1/4" ones we needed.

Now take all your fabric hexagons and rotary cut them in half, like you did for the template...

from point to point.

The half hexagons should look like boats now.

Stack and pin 6-8 half hexies together.

Place your super duper new template on there and...

see that little dog ear? Grrrrr...

snip that devil right off!

You don't know it now, but that little snip just saved you hours of ripping apart seams that didn't match.

Two corners snipped.

and many more to follow.

Now on to the layout and assembly...
Position your half hexagons in the desired pattern, making sure you have each hexagon shape back again.
This picture below shows the first 3 rows sewn together and the rest laid out in the flower shape in a ROW by ROW format. If you hand sew hexies with English paper piecing, you have to get that process out of your head for machine sewing. You will be sewing the half pieces together left to right to make a row, then sewing the rows together.

Each row consists of the boat shaped half hexagons...one long side up and one long side down.
See where I'm pointing to: the one snipped dog ear at the top of the red and white fabric...

and the other on the bottom corner of the blue fabric?

Bring the red and white fabric over to the blue and match those side seams. One snipped dog ear will match the top part of the blue...

and the flat side of the red and white fabric will match the snipped dog ear of the blue. Ok, I know this may sound confusing, but when you actually do it with fabric in hand, you will see immediately how it matches up.

Sew the seam with a 1/4" seam allowance. Sorry I used white thread...what was I thinking. You can click the image to enlarge.

Fold open and now you have perfectly lined up edges.

When sewing the half hexies in a row, you will be alternating how the pieces are placed. One will be up like this...

and the next one will be down like this. Another one of those moments when you will see it when you do it yourself.

Here is a picture of all the rows sewn together.

This is a close-up of the first 3 rows sewn together. This also shows the one up and the one down in the red polka dot row.

When all the half hexies are sewn together, you now have to sew the rows together from the top of the flower to the bottom, matching seams as you go.

This picture is of the first 4 rows sewn together. Make sure you check as you go to make sure you have the right design shaping up.

More rows added.

and now we're all done! You could easily applique this onto something, but remember that all the outside edges still have an unsewn 1/4 seam, so you'll have to turn that seam before you sew.

Here's a close up.

Here's one way to use this flower...a pillow.
Iron all your seams flat first. Then place hexagon flower right sides together on backing fabric.

Pin all the sides.

Sew with 1/4 seam allowance, pivoting with needle down at all the points.

Leave an opening for turning. I just left one edge of a hexagon open and that was too small for stuffing the pillow, so adjust for yourself.

Trim away all backing fabric.

Snip a little in the inseams.

Better results when you turn it right side out.

Turn right side out. See this is where the frustration set in for me with that too small of an opening I made. It was like...well, you fill in the blank. All I can say is that flower was beat up pretty badly!

But she turned out pretty as a picture!

and here's the back of the pillow. You could always make another flower and use that as a back too.

This is that stupid, oops sorry, that small opening I had to stuff through. I know what you are thinking...why didn't she just rip it open more? I hear ya, but I was so near the end and that smaller opening was easier to close. Crazy I know! or is that Lazy I know!

Here it is all stuffed.

and looking all pretty!!

So now that you know how to sew hexagons on the machine, there's no stopping you now. Dig into your stash and start cutting!

Do a google search or an image search of Half Hexagon Quilts and take a look around the web for inspiration.
Hope you're having a wonderful weekend,
~Karen~
space
Don't forget, if you haven't enter The Accuquilt Go Cutter Give Away yet...go HERE
That is an easy way to do them on the machine and a fun idea for a pin cushion too. I like small things, lol.
ReplyDeleteDebbie
I can see that it is alot like the tumbler block......how clever.
ReplyDeleteHi, Wow, thanks so much for the tutorial! I really appreciate it and have learned something here today...thank you! Plus, it's beautiful! I hope that you have a wonderful rest of your weekend!
ReplyDeleteHugs...
Bobbi
Karen~ thanks a lot, I really appreciate this tutorial. I want
ReplyDeleteto make a red and white throw or
maybe I'll make a pillow. I
think the small opening was fine,
it worked didn't it? It's a lot
easier to close that small opening
than a large one. I would be like
you the smaller the better. I sure
hope you have a nice weekend.":O)
What a wonderful tutorial Karen! I loved all the detailed photos! Thank you!
ReplyDeleteThanks for being very detailed!
ReplyDeleteP.S. I'm lazy too, and am always doing things like leaving the opening too small! I don't blame you.
Karen, Wow, I think I can do this. I've always been afraid of hexagon quilts but you made it seem doable. Thanks, Patty
ReplyDeleteThats fabulous Karen....you are a genious! Thanks for the really good tutorial too :)
ReplyDeleteI'd like to make bigger ones, for table placemats. That would like that better than pillows. Lots of ideas for hexies. thanks, jo
ReplyDeletethat's a wonderful and so detailed tutorial. Thanks for the pics.
ReplyDeleteVery informative and fun!
Gina
You do EXCELLENT tutorials, Karen!!! Thanks!!!
ReplyDeleteGreat tip and tutorial, thank you!
ReplyDeleteEXCELLENT dirctions! Thanks, Sandy
ReplyDeleteVery cute pillow Karen..
ReplyDeleteexcellent post! I need to bookmark this!
ReplyDeleteLove how you snipped the dog ears that works great with all triangles, thanks for sharing.
ReplyDeleteVery interesting tutorial. I've always wondered how hexies could be machined...
ReplyDeleteyou certainly give good directions
ReplyDeleteWhat neat ideas! The pillow turned out so pretty!
ReplyDeleteMicki
What a great tutorial! Your pillow is adorable!
ReplyDeletehelo !!!excellent tutorial !!!!!
ReplyDeletethank you!
desde Argentina te mando un abrazo!! JOR:)
Another precise tutorial.
ReplyDeleteYou have changed your heading. Much more sewing themed, but I did get a fright when I clicked in and the tea for one was gone.
Debra - Australia
Wow! Thanks! You make it seem so easy, but now I guess it really is!
ReplyDeleteGreat tutorial, Thanks!
ReplyDeleteHi Karen.....great idea. Will make great gifts for the granddaughter's rooms. They're all into hot colors these days...zebra stripes w/hot pink and pale pink; another loves orange, lime, aqua & lemon and one can't get enough of chocolate, pink and aqua. I'll send you photos.
ReplyDeleteChris
Beautiful hexies!!! I'm not a quilter yet, but you make it look like lots of fun. I might just give it a try!!!
ReplyDeleteLovely thanks Karen but why didn't you add a quarter inch to the side where you cut the hexagon in half?
ReplyDeleteThis is the best hexagon tutorial that I have seen! Thanks for taking the time to share it with us!
ReplyDeleteStefanie
I love this pillow! It's been so long since I've done any blogging! I'm trying to be better:)
ReplyDeleteFor those who hate sewing the hexies together on the machine using the Y-seams, this is an excellent easier way. For me, I don't care for so many seams all over the place but it does get the job done in a lot less time.
ReplyDeleteThanks for the tute.
I've got to get myself a hexagon die!
ReplyDeleteI love it, thank you for de tutorial.
ReplyDeleteGood tutorial on the hexies!
ReplyDeleteespecially trimming off the dog ears on the main pattern piece.
Bev
When you split the hexagon into 2 pieces and then sew it back together without adding seam allowances, you no longer have a hexagon with 6 equal sides. Two of the sides are shorter. I guess many people wouldn't notice the difference, especially in a small piece like a pillow, but I do.
ReplyDeleteI would definitely add a seam allowance across the cut side. Then you can call it a hexagon quilt!
ReplyDeleteWow, great tutorial. I bought the half hexie ruler set from Lori Holt, did not know this was something I could do all by myself! I was thinking, you could use some light weight interfacing and sew it to your Hexi flower right sides together, cut a slit through the interfacing and then turn the whole thing right side out, press then applique onto a background square to make a quilt block (just saw her tutorial on using that method for making circle quilt blocks but first time I saw this method was from Eleanor Burns.) Can you use the same method for creating a template to clip off those dog ear corners for tumbler shapes as well? I have a mini tumbler ruler that fits 2 1/2" pre-cut squares but discovered that you can't just sew them with the raw edges even, you have to offset the points like sewing two triangles together. I've been wanting to create a plastic template from my acrylic template, draw the 1/4" seam lines on it, then use a tiny hole punch where the seams intersection, then transfer that point with an erasable fabric pen onto my fabric pieces but this looks so much easier, faster, more accurate etc.! Would love to know if you have a tutorial like this but for sewing tumbler shapes together!
ReplyDelete