
You can make that last step of writing out the envelopes a little easier by printing your own address labels for each person and making your own return address labels too.

I have been making labels for years. I love using Avery labels you can buy in office supply stores or even Walmart. They come in so many sizes and colors.
I use these for everything...not just addresses. I label supplies, boxes, crafts, containers etc.

You can also buy store brand labels too. When you are ready to make your labels, just look for the Avery Template code. All generic brands will use the Avery Code.

I use the address label size in either clear or white.


How To Make Labels Using Microsoft Word...
This tutorial is on an iMac, but Microsoft Word has made it easier, so I think using a PC is similar.
1. Open New Document

2. At the top, click "TOOLS" then scroll down to "LABELS".

3. This window will pop up...
- ignore that top box
- go to the middle section where it says "OPTIONS".

4. This window will pop up...
- For the Label Product section (first arrow) you will click the labels you have. Most likely "Avery"
- then scroll down to select your Template Code or Product Number found on the package (second arrow)
- click OK

5. This window again to select Number of Labels...
- click "Full page of same label"
- if you ever want to print just one label in the future, you will choose the second option to isolate a particular label by row and column that you are printing
- click OK again

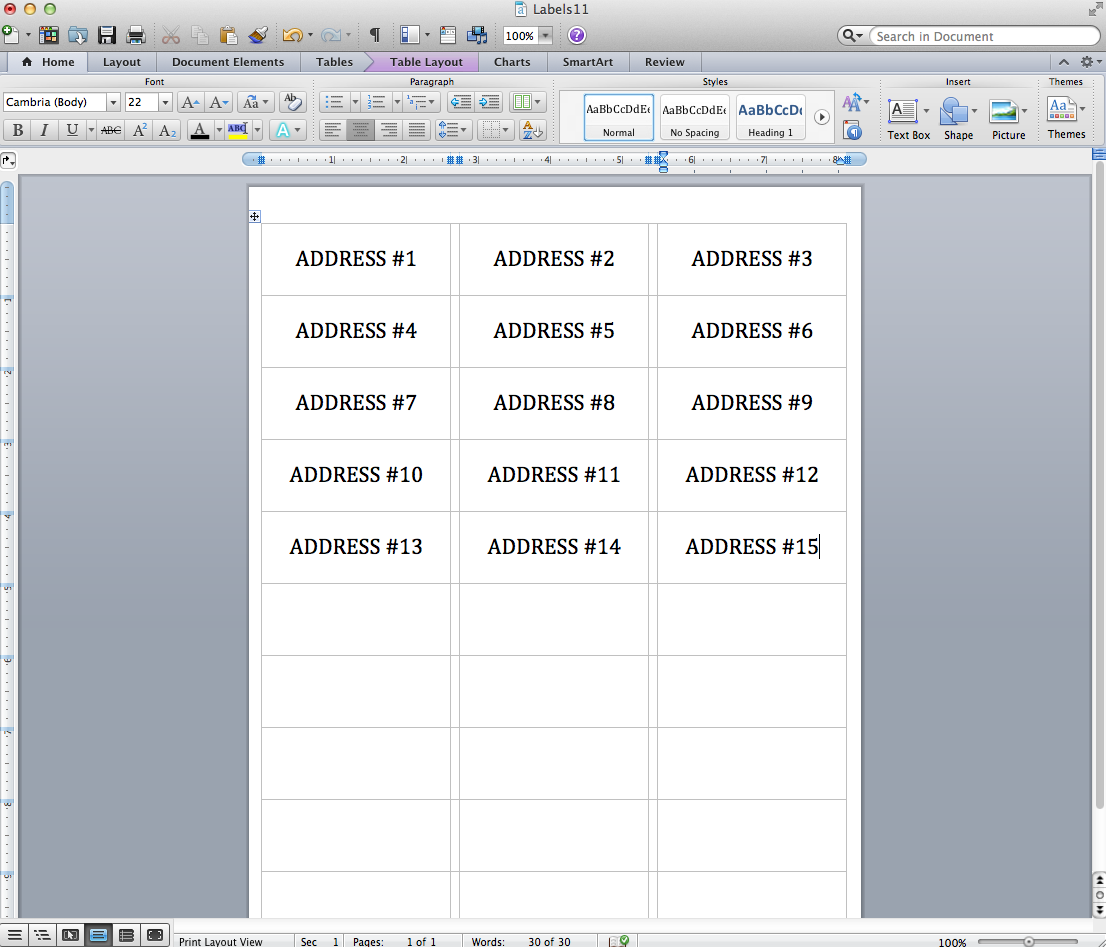
6. Now the full page grid of labels should appear.
If your page is blank, go to the top, click TABLE then scroll to where it says gridlines and check that. The gridlines should appear. They will not print, they're just for when you are typing.

7. For all the same return address labels...
- type your address
- choose fonts
- font size
- center it or have it on the left
- high light your address, right click and click copy

8. Then "Paste" it into all the other labels. Once you have a few rows pasted, copy all the rows again and paste the entire set.
Then print as many sheets as needed.

9. Now for each individual address for each Christmas card recipient...
This first phase is time consuming, but once you enter in all the address, you will save it and just print it out each year. It's also easy to change each label if family or friend's addresses change.
You can also merge your address book if you have them stored on your computer.
Just type in each (different) address in each cell and print the entire sheet.
I hope this makes your Christmas card writing a little easier this year and all the years to come.
They also sell labels that are decorated for Christmas too, so look for those in stores.
Happy Printing,
~Karen~

Thanks so much for doing this step by step. I always think about it when I see the label sheets but thought it would be a big hassle.
ReplyDeleteYou make it sound so easy. Thanks for the great tutorial. I am ready to try this!
ReplyDeleteThanks for this. I do have Labelmaker Pro and it is pretty easy. I put a picture of a quilt or a dog on each label. But you should be able to do that this way as well!
ReplyDeleteglen
Great tutorial, I'm going to do this. I added it to my Pinterest board, hope you don't mind.
ReplyDeleteI've been doing this for years and think it is the best idea! My friend always gets her name printed in her Christmas cards and then hand addresses the labels. Frankly, I would rather have a hand signed card with a note and a pre-printed address label...so that's the way I do it :)
ReplyDeleteThanks so much. Yes, Microsoft Word is very similar. Uber easy. Your tutorials are always so clear and complete.
ReplyDeleteWhat great step by step instructions! Thank you!
ReplyDeleteThanks for the tutorial! Really enjoy all you have to offer! Kathi
ReplyDeleteI've been doing this for years as well. I actually add a clipart picture to each label that matches the theme of the card inside.
ReplyDeleteAvery Labels are the best.. I prefer them to store brand :)
ReplyDeleteI have the avery label program at work and it works great too
nice post love it
ReplyDeletesildenafil softgel capsule
Thank you so much for taking the time to share this. Its something I've always wanted to know how to do. I used to print out address labels at work, but it was already set up ready to use. You explained it so well.
ReplyDeleteI have also been doing this for years. I have Printmaster, so I customize the label to the season. I like sending cards out, it's how I keep in touch, so it's fun to have things like a Christmas tree, turkey, birthday cake, etc. on the label.
ReplyDeleteGreat post, very informative and helpful! We (OnlineLabels.com) need to send you some samples of our label sheets for your next labeling project. Maybe we can be your new label sponsor :)
ReplyDeleteThis comment has been removed by the author.
ReplyDelete