Have fun looking through all my picture links in the pages above, but don't forget to visit the other fun posts in my blog too!! I don't want you to miss anything!

Tuesday, March 30, 2010

Tool Time Tuesday...Laundry Rack Fabric Organizer

Happy Tuesday Everyone!! Before I begin, I want to again thank each and every one of you who email me or leave such wonderful comments on my blog. I read every single one and even though it may take me a while to respond, know that each one means so much to me!
space
Now onto the laundry. I love doing things around the house...cooking, cleaning, organizing, moving furniture (that's for you Jenny in Australia), but laundry...not so much. Don't get me wrong, I love "doing" the laundry. I have organizing bins to separate the colors, I have little baskets to carry it down stairs to the washer, I like picking out the soaps and dryer sheets that smell the best... it's putting all the laundry "away" that I hate.
space
When doing laundry I use these racks all the time. I dry all our clothes in a dryer except for my husband's. He is 6' 3" and the length of his pant and the fit of his shirts are just perfect as long as I don't dry them in a dryer...hence these racks.
space
However, I stole this one a long time ago for my quilting.

space

space
I also bought this mini one for a table top version and it also mounts on the wall.
space

space
What do I use it for? Well, I use the mini one to keep fabrics neat and wrinkle free as I'm cutting strips or blocks. In the past, I would just throw the fabric in a pile off to the side and when it was time to go back and cut more, the nice neatly ironed fabric was a mess. This way I'm not searching for it either.
space space
You can use the stand up larger one for fabrics too, but I've been using it when I'm strip piecing. This pattern below is Triple Irish Chain. It has 6 different strip sets. Strips that are 1 -1/2" wide and 44" long.
space

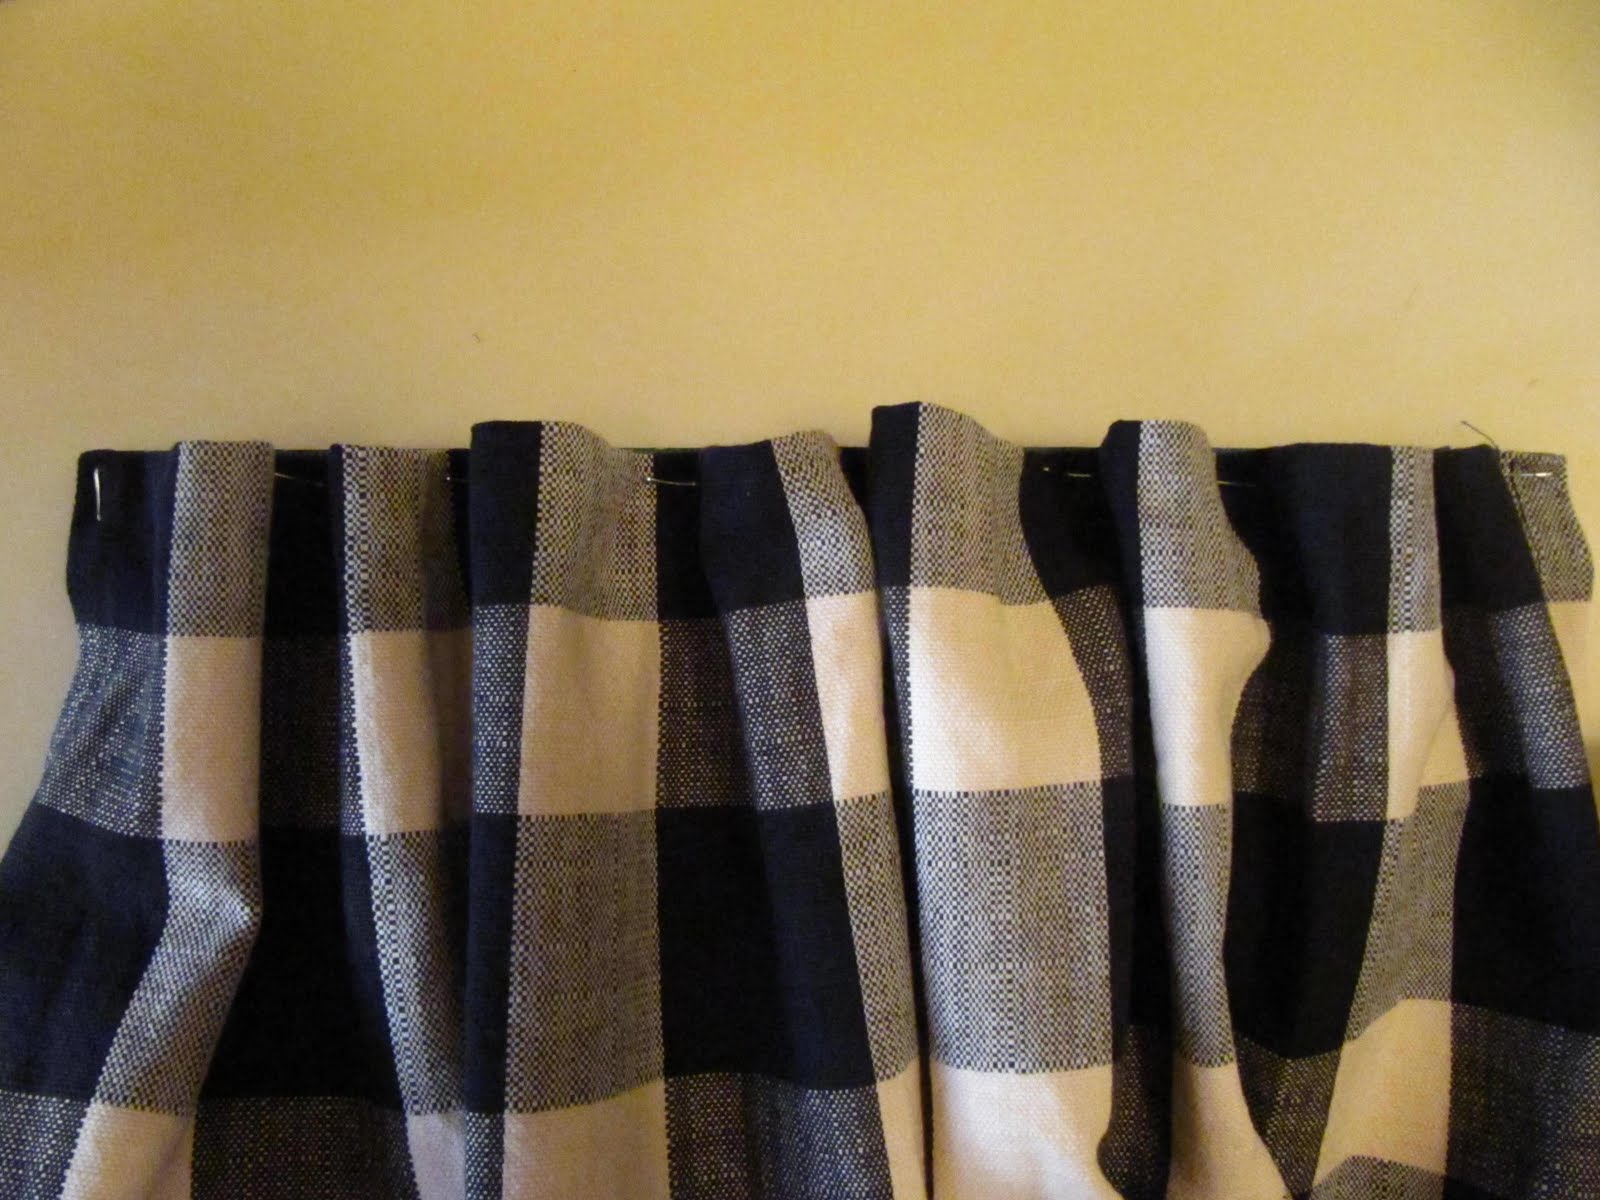
Here's a close up of 4 of the 6 I have to sew together.
space

This is the first strip set "A" that I cut from Moda's Rouenneries. It's all laid out on my cutting table. If I left it there and started to put together the next set (set "B")...I'm seeing a seam ripper in my future.


So here's what I have been doing for years. Hanging the strip sets on the drying rack in the order I have to sew them.


I keep this by my sewing table when I'm sewing this type of project.


These racks fold up very easily and can be stored under a bed, in the closet or behind a door when not in use. The small one that I mentioned before, can be mounted on the wall and it's collapsible too.


This rack is a seam rippers worse nightmare. It will keep you organized and all the strips will be sewn in the correct order.


Give it a try. It works so well...this rack will be in your sewing room forever. You'll never have to do laundry again. Oh wait, that's not possible. Wishful thinking though.


Have a wonderful Tuesday,
~Karen~

Sunday, March 28, 2010

A Trip of Hexies...

I had a little MODA-vation this weekend to sew some more hexagons...a project I had started a while ago. I think this was our last weekend of college tours, so we drove to Massachusetts and then to New Hampshire. I always bring some kind of hand sewing in the car.
space
I have all these 4 1/2" and 5" squares from several different Moda lines...Mistletoe Manor for one, but can't recall the others.
space

space
Then I have some yardage to cut up too.
space space
Some of that above fabric, equals these...


and these!!


This is the bunch I sewed in the car. I made this project using a bigger hexagon, so when I start sewing them together, it will finish up faster!!! Unlike this project of smaller hexies, which I will be sewing for the rest of my life.


If you are new to hexagons or Grandmother's Flower Garden, I have a tutorial for English Paper Piecing here. (I really need to redo that tutorial...that was one of my firsts, only blogging for a few weeks last February 2009.) Such a newbie!
space
Happy Sewing,
~Karen~

Wednesday, March 24, 2010

Curtain Update...

Do you remember this post I did with the pink curtains for Courtney's dorm room. It was a quick treatment for cement dorm walls. I cut up the dust ruffle to her comforter set and made a curtain. I stapled it to a yard stick and was going to hang it on the cement wall over her window with velcro. The disappointment in that post was never showing you the final picture of it, because you are not allowed to hang anything on the dorm windows due to the fire hazard.
space
Well, take a look at the below pictures (after Courtney's pink curtains) for an update I did on our little guest bathroom.
space


space
space
I had a regular old curtain in here. Thought I would change it up with just a valence. Love, love, love toile, but the valence wasn't enough. So I added the side panels. I had this yardage of the large black check that I was using as a table cloth, but wasn't using it, so I chopped it up!!
space
space
All you need to do is make or buy the side curtain panels, staple gun them to a ruler...I used a 12 inch ruler for each side and add dots or strips of velcro, depending on how heavy your fabric is.
space

space
Space the fabric evenly when you staple. Just use the inch marks on the ruler as a guide.
space

space
Here's the gathered front.
space

space
Add the velcro to the woodwork or window frame. If you have special woodwork, I'd test the velcro sticky stuff first. I don't care about the woodwork on my windows, because you can't see it and can be easily painted if the velcro pulls the paint off.
space


Just stick the ruler up there and you are ready to go.


The great thing about this is, you can easily change the panels out for the seasons or take them down if you just want the valence.


All it takes is some velcro, rulers or yardstick...who knew. You can also use the famous FREE paint stirring sticks from the hardware store too.
space
Have a great day,
~Karen~

Tuesday, March 23, 2010

Tool Time Tuesday...Window Design Wall

Happy Tuesday! Ok, you all know by now with the many titles I've made up for these TTT, that I love play on words or just crazy titles in general. Well, I think this title and this Tool Time might be one of my favorites. That is so scary to say, because if this bombs then I look foolish. That's ok though...I know that there should be at least one person out there who will like this.
space
Do you remember this pvc design wall? There was a bigger one too.


Do you remember this design wall for smaller projects?

space
Well, here is the next "Window of Opportunity". (I just love saying it) It's a design wall for a window, that can be easily removed when you're not using it, especially if your sewing room is in your dining room, spare bedroom or a room that you just don't have enough wall space. There is no wall space in my sewing room, so that's why I came up with this simple solution. See my sewing chair in the picture below? I thought I could just lean the big pvc design wall up against the window to my left while sewing. Then I thought, I wish I had something "IN" the window. Ding...the bells were ringing. A design wall curtain!!!
space

Here's all you need...a flannel backed tablecloth...$5.00 at Home Goods. You can also use flannel by the yard, but this was 60" x 102" for $5.00, so that's cheap, cheap, cheap!


and 2 tension rods that open or expand to the width of your own window.


I've had these for a while, so not sure how much...maybe under $2.00 each at Walmart.


Oh yeah...you need a window too!


Place a tension rod at the top of the window and...


at the bottom.


This is a dumb picture, because you can't even see the tension rods. I'm leaving it here though, because with my luck I would click to delete it and blogger would delete the wrong picture.


Measure the width of the window.


and then measure the height.


I folded the tablecloth in half, so I could cut the width easier.


I cut mine exactly 28" for the width. The front is vinyl and the back is flannel, so it won't fray. There is no need to turn the edge under.


Even though my window is 64" high, I just used the 60" width of the table cloth.


Fold over the short edges of the tablecloth, vinyl to vinyl, wide enough to fit your tension rod.


Here are the top and bottom folded over. If you want to get rid of the package wrinkles, use a very low heat iron and iron on the flannel side. Be careful not to melt the plastic.


Sew a straight seam all the way across both the top and bottom. Insert rod through the pocket and you are ready to hang it up. Super easy!!


Hang it flannel facing out, pull the rods so the flannel is tight and you are ready to hang your blocks or squares and design away! I took the picture at night, because the green design on the front was showing through in the day light.


Here are some of the I Spy squares I am starting to put together. Boy do they stick to flannel.


When you are done quilting for the day, just pop it out, roll the flannel around the rod and store it away until the next time.


Don't let this window of opportunity pass you by...ok, I won't say it again, I promise. Go on, make one for yourself or a friend...they will love it.
space
Have a great Tuesday,
~Karen~

Monday, March 22, 2010

Non Quilting Request...

I know I have posted this picture before...it's from our college tour trip to Boston for our daughter Kelsie and Courtland, our oldest daughter Courtney's boyfriend. I'm doing this post for Courtland, because we love him to pieces...hi Courtland!! Courtland is a senior in high school and is off to college in September. He is a very hard worker, super smart and loves, loves, loves music.
space
Here's where the request comes in...Courtland and his friend George entered their song in a radio contest and were chosen to be in the final round...kind of like an American Idol. If they are picked, their song will be played on the radio next Monday on Jammin 107.7. It's a very big deal and we are so excited for them. They both wrote the lyrics and Courtland did the music for the song.
space
Here is a link to the contest. If you would like to listen to their song and watch their video, it's listed under the title "George". You can vote for them at the bottom of the page. Just use the drop down link and click on "George". They did a live audition with only an hours notice to get there. I think they were great! If they win, they will be on radio and win a cash prize, which will help with their college bills!!

Thanks for helping them out and for voting!!
~Karen~

ps...it's a nice "clean" song about meeting a girl and Courtland is the one in the shorts in the video!!


Sunday, March 21, 2010

Tool Time Give Away Winner...

I want to thank everyone for all the wonderful comments about Tool Time Tuesdays. I've had so much fun thinking of ideas to pass on to all of you. I hope I can keep it up a little while longer.

And now for the winner!!!! The random number generator pick #32, who is...


Congratulations Zlaty
space
Thank you again and I'll see you Tuesday.
~Karen~


Saturday, March 20, 2010

Give Away Update...

Hi All... went shopping this week and picked up a few more things for the Tool Time Tuesday give away. The picture below shows a paint tray for organizing, things for the snowman kit, paint sticks, coffee filters, 2 cup holders, a package of name badges, a new spray bottle and I think I can add a few more things.
space
If you want to enter the give away, go to this post and see all the other items and just leave a comment there to enter.
space
If you want to see all the Tool Times Tuesday posts that some of these items are used in, just click here.
space
I will pick a winner on Sunday night. Kelsie is marching in her last parade tomorrow, so we won't be home til later in the day.
space
See you tomorrow,
~Karen~


Tuesday, March 16, 2010

Tool Time Tuesday...Bottle Cap Pincushion Ring

Caps, caps and more caps...we all have them and we all throw them away. They come in so many shapes, sizes and colors. Maybe after this tutorial, you can save a few of them from the trash!! I remember making these little pincushions years ago, but I thought I would share it with you today!
space
These caps came from water bottles, soda bottles, juice containers and the big red one is from a jar of peanut butter...we all know I'm having issues with peanut butter lately, so I'll save that one for another time!!
space
space
the supplies you will need:
spacescrap fabric
space

elastic...I used the mini size in the middle
space

a drill, with a small drill bit and some hot glue.

Instructions:
Pick your cap and mark 2 holes on the inside with a marker.


Carefully drill the holes...start slowly. I used a wood block so I wouldn't go through the table.


Here are the finished holes.


Take the elastic,


and thread it through the holes from the flat side, up into the inside of the cap. Leave a loop for your finger.


Here's a close up.


Place the loop over your desired finger and measure 'til snug, but not too tight.


Now tie off in a knot on the inside of the cap. Be careful not to pull up the loop that you just measured for your finger.


Here's what it looks like.


Now pick the fabric...this is a navy blue dot, but it looks like black. I'm not sure how to measure for the pincushion part. I just had about 1/2" - 3/4" margin from the cap to the edge of the fabric when I used this can.


Trace and cut out the circle.


Now sew a running stitch by hand or basting stitch on the machine all around the edge of the fabric.


Pull string to gather it up.


Now you need to stuff it.


why does blogger just decide to flip pictures on you!!?
space

Pull tight and knot off.


Here's the little ball of fabric.


Now squeeze some hot glue inside the cap...


and pop in the ball.


At this point you can be done, but I know you have a little trim somewhere in your stash!


So let's add a little cuteness!


What is this about 25 carats!


Now how about a bigger one for your sewing machine or table.


Repeat all the same steps for the ring, you just don't need to drill the cap.


Tah Dah...

Now she has a big sister. (If you wanted to make the medium size caps into a bracelet pincushion for your wrist, then you would just drill holes a little larger, use a wider elastic and follow the same steps for the ring.)


You can mount it where you'd like with some velcro squares.


One part on the back and the other on your machine, cutting table or ironing board.


Very handy where ever you keep it!


These are very fast to put together and make great little gifts to add to a sewing package. Make up a few of them and tie them to the top of a gift for your favorite sewing friend. Great little favor for a guild or sewing bee party.
spaceSo go dig through your trash or finish off that juice in the refrigerator, because you need a new pincushion!!
space
I also want to thank everyone for all your kind words and comments for the Tool Time give away. I am just blown away! A very heartfelt thank you to each and every one of you.
space
Have a wonderful Tuesday,
~Karen~

LinkWithin

Related Posts with Thumbnails