Today, I want to share a faster version of lined drapes...using pre-made cheaper drapes first!! The cheaper drapes become your lining.
I wanted new drapes in my daughter Kelsie's room, but didn't want the full project. I needed quick and easy and to use what I already had hanging in her room. I used what she had as the lining for the new.
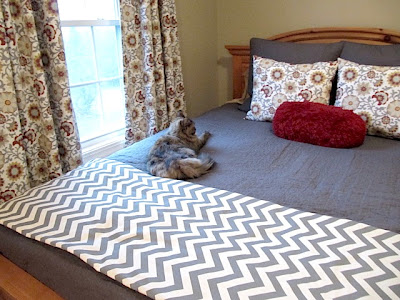
Here's the new look...
Sorry I didn't have a pre picture of the drapes in her room before, but they were tan black out drapes from Walmart for $10.00.
That's the QUICK part of this project. I used those drapes as the pre-made lining of the new drapes.
First step...
Sew hem on the bottom of the fabric you want to show in the room.
Lay the pre-made drapes that are now your lining, right side up on the floor. I used enough of the printed fabric to match the length of the pre-made drapes plus a little more for one hem on the bottom and about 1-2 inches to hang longer than the lining.
The pre-made drapes are wider than the fabric off the bolt, so I had to trim it away.
Cheap pre-made drapes for lining and decorative fabric...right sides together.
The store bought drapes at Walmart happen to be black out drapes...not bad for $10.00.
Now sew up one long side, across the top and down the other side. You will be leaving the hemmed end open.
Turn right side out and iron all seams.
That's it!!
The old drapes are now the lining!!
I used the rod and clips to hang them.
The curtains and pillows are Waverly Pinwheel Parade I bought at a local fabric store...cheap! The chevron fabric is from Hobby Lobby.
The quilt and shams are from Ikea!!
This is Hallie...she sleeps on every one's bed, but both my daughters' beds more...she misses them when they are away at school.
Happy Sewing,
~Karen~


Just so's you know...this is genius and so are you! I'd never have thought of it, thanks! xx
ReplyDeleteI have some awesome black out drapes in the front room that we got on clearance for a few dollars a piece and I love that they are blackout curtains, but I kind of hate the color. this is a genius idea!! I had been wondering if I could do something like this, so thanks!
ReplyDeleteVery clever again, Karen! Just one question---the blackout drapes are one layer or two?
ReplyDeleteLove that gray quilt and the chevron mixed with your new floral drapes. The kitty is a perfect complement to the new decor!
Poor lonely Hallie. She needs a friend from the shelter for Christmas perhaps???
ReplyDeletePerfect solution for those of us hating the idea of making curtains. All that measuring and hemming drives me nuts. Thanks for another great idea.
ReplyDeleteI love the natural coloring of the filters. Looks great! I think this will be a project for January after all the Christmas decor is put away. Love all your ideas!
ReplyDeleteI like to do this kind of thing! It is a great way to use thrift store finds and hand me downs, too!
ReplyDeleteHer room looks pretty.
This is an excellent idea. I'd like to add something from my experience. I made lined curtains for my son's room and stitched the sides of the lining and the fashion fabric together as you did here. However, the fashion fabric stretched after about two days and the curtain lining did not, so now I have drapes that looked like they're somewhat "gathered" on the sides and they puddle along the bottom hem (which is at sill level, not the floor). Next time, I'll hem the side and bottom edges of the lining and fashion fabric separately, but sew them together along the top (either a rod pocket or just finished off for clips). Doing it that way will require a little more math, but I think the end result will be better. I may need to temporarily baste (or pin) lining and fashion fabric together for laundering, just so I don't wind up with a very long piece of twisted fabric coming out of the washer!
ReplyDelete