
I just love Christmas and this time of year. Decorating for the holidays for my family and friends is my absolute favorite thing to do. Every room in the house has a tree or some little touch of Christmas. I have been collecting decorations for over 30 years and each year I add something new to that collection. However, as many of you know, I am a big shopper of "after Christmas" sales and thrift store finds are the best! You can really change the look of your home by using what you have in different ways year after year. I'm hoping some of my tips and tricks in this year's post will inspire you in your holiday home!
Welcome to our home for the holidays...

Our front porch...

Branches of evergreen wired together to create small swags for each rocking chair and a basket of mixed greens cut from the yard. Nothing is better than free!

Front entry...

Here I've used sugared fruit I've bought from Walmart and thrift stores over the years. In years past, I've used this fruit in trees and on the stairway banister. This year it welcomes you at the front door.

The fruit on the wreath is my new find this year.

Consignment shop napkin rings for $2.00!! I just tucked them into the wreath.

All the silver accents are also from thrift stores except for the bigger cloche on the right. That was a gift from my hubby.

This cloche was a "put together set". The bottom is a random candy dish and the glass is the top to an old brass clock. Fill it with sugared fruit, ornaments or pinecones and you have a beautiful decoration.


When you shop sales, thrift stores or yard sales keep a theme going so you can use different items in different ways all over your house. I tend to buy silver colored items and that works for me.

From the foyer into the living room.
We're not fancy people at all, so this really is like a second family room rather than a living room. If you look back to previous Christmas posts, this room is also my dining room sometimes. If you know me, you know I move furniture around like there is no tomorrow.
In the past, when my girls were home and friends and family filled the house, I needed a bigger room for a larger table. This was our dining room right off the kitchen.

I just love the look of white faux fur for this room.

I used the same flocked tree in here with all silver and gold ornaments.

I bought 2 faux fur throws at TJ Maxx and Marshall's for $20 each. My plan was to make the stockings from one of the throws and the wreath and a tree skirt from the other.

I found these stockings for $12 each, so a splurged on them!

Here is the wreath I did make from the throw. I will post about it, but it was super easy. I just cut strips about 4 inches wide, the length of the throw. Then all you do is wrap it around a styrofoam wreath form and use a floral pin to secure!!

Last year's mantel flowers with fresh greenery added.
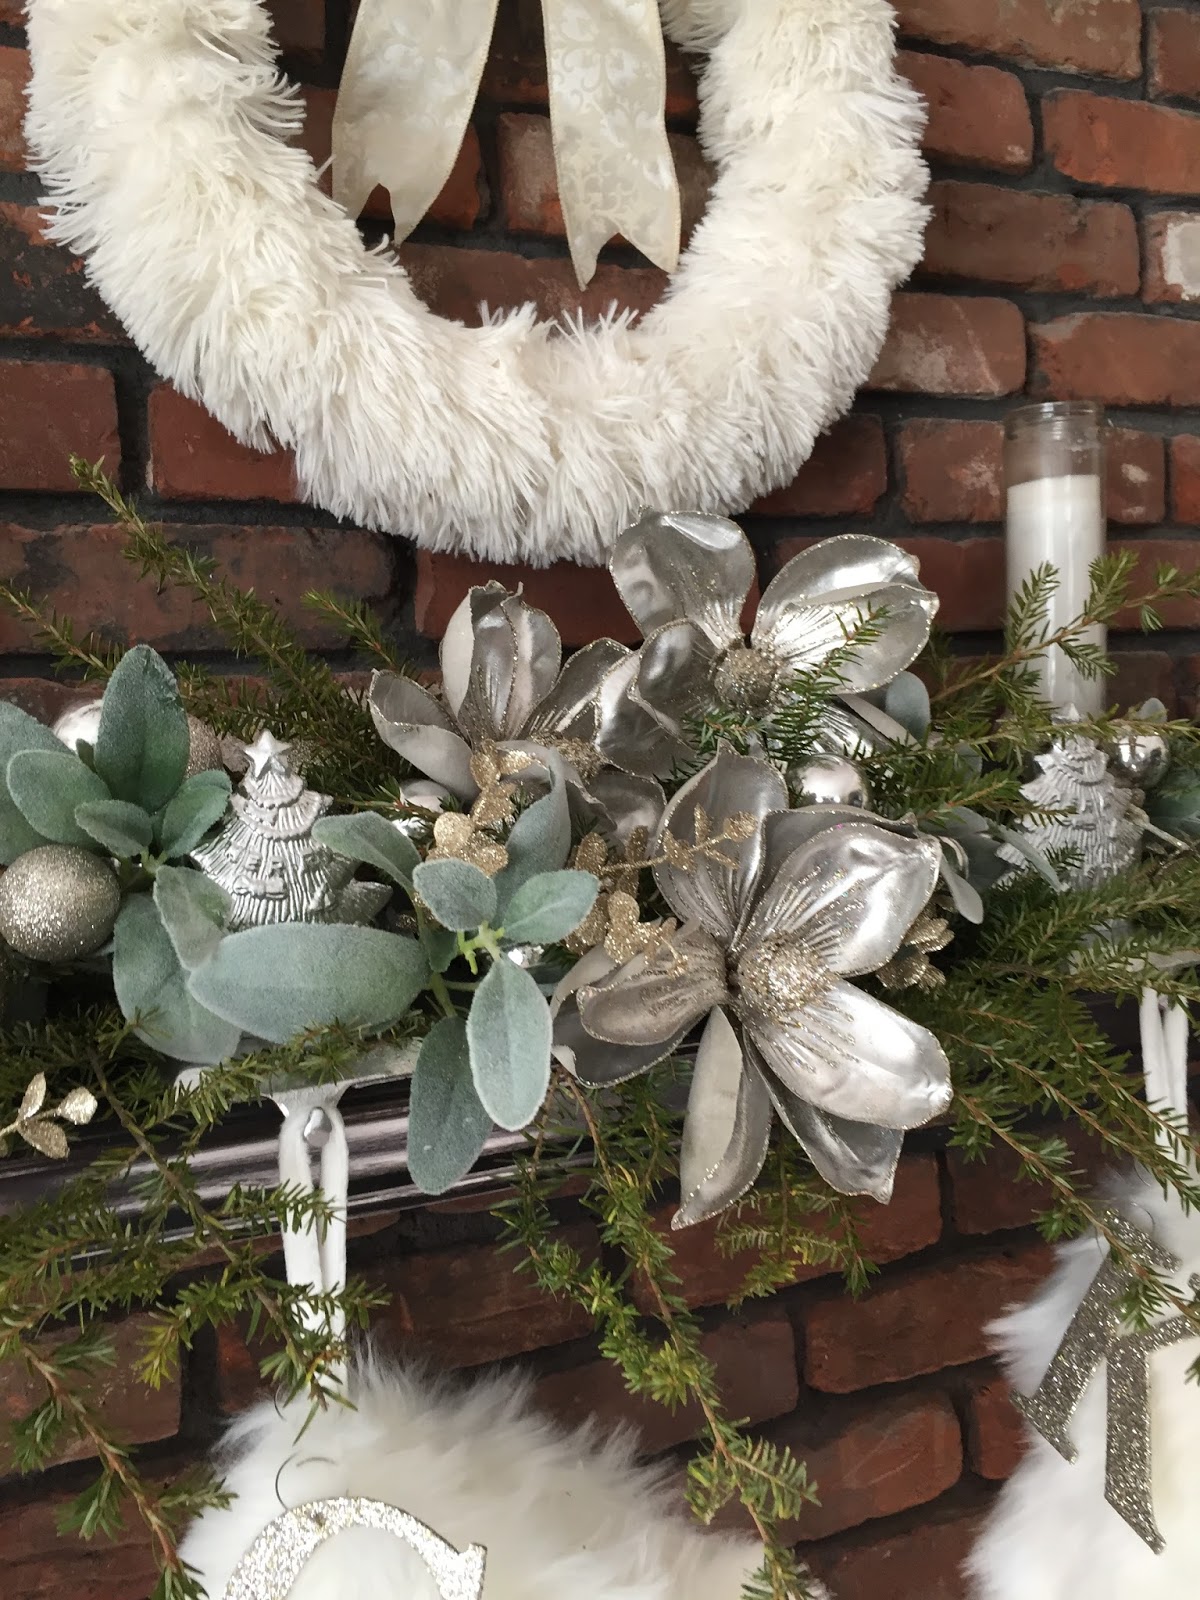

The silver glitter letters are from Walmart for only 98 cents. I buy them early every year, because they go fast. I use them everywhere. They're great for ornaments for trees with every one's initial.


The stocking holders were "not so good looking" in years past, so I spray painted them silver to match the theme.
The pillar jar candles are great for all over the house. They are from the Dollar tree...$1.00!

I tried something new this year for the fireplace. I filled it with logs from the wood pile! I love the look.

Here's my family picture frame tree in silver and gold.

All the ornaments are mostly from Walmart or Dollar Tree and the frames are from the Dollar Deals section at Michael's.

Here is the throw I cut up to make the wreath. I used the remainder of the throw to wrap around the base for a tree skirt. I layered with a silver tree skirt I already had.

I always have wrapped packages under all the trees. I am never that prepared that my real gifts are wrapped and under the tree, so I just wrap empty packages and re-use them each year.

Here are all the ornaments up close...
Gold, silver and champagne colors all go together well. Texture is the key. I use glitter, shiny, matte, big, small and all different shapes.

Letter, icicles, reindeers, frames etc...


I bought these frames a couple years ago and never got around to putting pictures in them. I'm so glad they are on the tree this years. I just love my family to death and miss them terribly. I sit right next to this tree each night watching Hallmark Christmas movies and I get to see their smiling faces all the time!!

Courtney and Courtland...

Nick and Kelsie...

Hubby and me...


I made this wreath with dollar store ornaments and heavy duty wire...probably less than $5.00.

Years ago, Courtney's tree in her room was all silver and Kelsie's was all gold. Now that I've combined some of them on one tree, I have left over ornaments.
I just put them in this old tool box I painted black to match my furniture.

It was kind of dark underneath this hutch, so I added a string of lights among the balls.

This year's Dining room (or last year's living room)...

Dickens Village Tree.

I wired my Dept 56 Dicken's Village houses to the tree.

I added snow batting under each house.

Filled glass ornaments with snow.

Add snowflake ornaments and sprinkle more snow on all the branches...

All the extra houses are in corner cabinets in the room.

and I also added some under the tree.

I saw this idea in Country Living magazine...
I used little porcelain houses that I already had from Walmart. They were only $1.50. I wired them into an artificial wreath and hung it on the wall as you enter the dining room.

I just added small trees, batting and sprinkle snow!!

Off to the kitchen...

Candy cane central!

Santa hats turned upside down for the banister decorations.

Greenery, ornaments, candy canes and curly thingies are added to the santa hats!


I cut 2 small slits in the hat and zip tied it to the banister.

My little teapot tree is always in the kitchen.

Teapot base.

and my tea ball collection for ornaments.

Little touches of red...

Extra red ornaments fill the mixer!!
That little Swiss Roll "cake" tutorial coming this week for a last minute gift idea!!

Last year's peppermint candy cane tree is dismantled and all stored in my canister set!!

and don't forget last year's idea of Santa coming down the chimney!!

From the kitchen to the family room...

This 12 foot tree is just filled to the brim with every ornament that we have collected or made as a family over the years. Every single one has a special memory or story about our lives.


Memories...

and more memories.

Each one more precious than the next.


but the ones the girls made in school are always our favorite...cardboard tube angel and a Popsicle stick sled!!

I had my ladies party this past weekend and I used these crystal bowls for punch and egg nog. Big check bows always add a holiday touch.

The black and red check and chalkboard was the theme in the family room this year. I used little chalkboard clips to label what kind of punch was in each bowl.

A little clothespin attached it to the center of the bow.


Little touches of buffalo plaid all over.

Even $3.00 baskets from Target!


More initial letters for the kids' stockings.

I used berry garland on the banister this year instead of garland on a tree.

Let's head upstairs...

At the top is the master bedroom...

Nutcracker theme in here with my mom's collection of little Steinbach wooden ornaments.

The big tree has the ornaments and the extra trees are only decorated with little white lights for a woodsy feeling.


Santa nutcrackers.


This was our old 12 foot family room tree, but I removed one section to make it a 9 foot tree to fit this room.

I crumpled up a piece of burlap for a tree skirt.

I wrapped boxes with brown paper and filled old burlap bags with toys, trains and nutcrackers.


The tree is filled with these adorable little wooden people!


This view is coming in from the hallway near the big tree.


Drape some garland on the end of the bed and a piece of plaid wool to look like a throw.

Mix and match all your plaids for a festive look.


I staple gunned some greenery to the wooden shadow boxes on the wall.

and little pops of color with extra ornaments near the nutcrackers.


This is the view from the bed at night...I just love it!

The master bathroom tree was made with pages from an old dictionary...the wreath too!

I only added chalkboard ball ornaments and little chalkboard gift tags.

I used dictionary pages to make the Christmas cones, the origami flowers, the paper ring garland and the glass ornaments filled with the paper curls.

I bought the white berries at the dollar tree.


The tree skirt was a thrift store find that sparked the whole idea. I LOVE the black and cream colored plaid.

and it's truly a "skirt". It's a woman's wool wrap skirt for $3.00!!

The tree is perfect with the dictionary page wreath I made off in the distance in this picture.

Now on to hubby's office...
A tree to remind him of his childhood.

Vintage ornaments, thrift store radio flyer with tricycle and lots of vintage toys from yard sales.


When I find old gems like these, my heart sings...


and this vintage tree topper was my best find.

The candy tree is in a little nook at the top of the stairs.

Lots of brightly colored ornaments in every shape and size.


I made another wreath with extra balls and wire. I zip tied it to an old window frame to make it look more substantial on this bigger wall.

A yummy candy bar too!


I used a white wicker basket and cotton batting for a tree skirt. It looks like a big cupcake!!


The green flowers are candle rings that I used a gift topper.


I buy candy ornaments after Christmas every year to add to this tree.

Glitter words and things that pop out of the tree gives it a whimsical look too!


I love using all different sized balls too.

We are a big Disney family and Kelsie is the number one fan, so I surprised her with a Minnie Mouse theme. I'm just sad she's in Florida this winter. I'll leave it up until she gets home though.


Minnie Mouse wreath!!

It was so easy to make. Three styrofoam forms and black garland that I bought after Halloween at 90% off. The garland had purple bats on it that I pulled off.

Wrap the 2 small rings, then the large. Wire the ears on the larger ring and add a bow!


Red and white polka dot gift packages are a must!

and here's Minnie!!

I bought the glove and slipper set on eBay.

I used a black curtain rod and slipped a glove on each end and slid it through the tree.

The skirt is just a 2 yards of polka dot fabric wrapped around a styrofoam base...post to come later with pictures. The fabric is sold by the yard at Ikea.

The tree topper is a Mickey Mouse pillow we had. I just cut slits in a santa hat and stuffed the pillow inside. Top with a bow!


I covered foam balls with batting to look like big snowballs.


Bows and sprinkle snow too!

and I sewed a quick chair pad to match.

Our other spare room is hard to photograph because of the light, but I tried.

Tan and gray plaid in this room inspired this white tree. The tree is filled with galvanized metal ornaments, wooden snowflakes, burlap and snow berries.

The snowflakes over the bed are super easy to make.

I had artist canvas from a discount store. They usually come in a package of 5 for $10-$15.

I just stapled burlap on the canvas frame and hot glued on these snowflakes from the dollar store.
Easy peasy!

I metal tray on the bed with a packages, ornaments and a battery candle for a homey feeling.

The white tree is filled with different metal shapes like this cute reindeer, burlap bows, glass ornaments filled with brown gift crinkle stuff and white berries.

Wooden snowflakes too.

Heres' a close up of the filled glass ornaments.

Store bought gift bows and gift tags also serve as decorations.


A big galvanized tub and batting for a tree skirt and a reindeer I spray painted silver adds to the fun with the packages.

Here's the tree lit up at night. Hard to see, but Hallie the kitty loves it. She sleeps on that couch every night.

I sewed a little burlap pillow, but I added these little burlap poinsettia clips that are used for gift packages toppers.

This is the girls' bathroom just done with a little silver.


Walmart and Dollar Tree trees...

I added a red ornament nose and red berry "antlers" to make this silver wreath look like Rudolph!


To finish up the tour is a little tree in my sewing room with berries and gingerbread men.

Gingerbread and red berries...nothing better for Christmas.

and this tree is outside my sewing room. I strung popcorn and fresh fruit.
Christmas for the Birds!!!

I hope you enjoyed yourself and the tour through our home. I just love sharing the spirit of Christmas and all that the holiday represents...love, family and friends.
We truly wish you and your loved ones a very Merry Christmas and the most wonderful New Year!!
~Karen~
*EDIT...lots of questions in the comment section and emails about where I store all this "stuff" lol. I will definitely do an organizing post when the holidays are over, but it's all in the basement. Our basement is unfinished and totally used for storage. I have one corner for Christmas about 10 feet by 10 feet. I use 24 red rubbermaid containers for each tree theme and decorations and lots of other cardboard boxes labeled to keep track of everything. I use the height of the room to store all the way up the walls. I will take lots of pictures to share with you later!
Thank you all for your kind words about this post. I just loving sharing our holiday joy with each and every one of you and what better time of year than Christmas.


Love your site and really enjoyed your tour of your beautiful home and all the decorations.Merry Christmas to you and the family and a Happy New Year
ReplyDeleteBeautiful. Lots of time spent adding the Christmas feel throughout your home.
ReplyDeleteHallo Karen
ReplyDeleteSUPER..................
TOLL........................
GENIAL.........................
wünsche dir eine schöne Weihnacht
m.l.G.Brigitte.
Thank you so much for the wonderful tour of your Christmas splendor! With each room I did not think you could get any better, and then you did, WOW! how long did you work on these rooms, amazing. Love what you did with you Husbands study. Fantastic work, Thanks again for sharing, the tips and inspiration.
ReplyDeleteYour home is always beautiful. I always enjoy the Christmas tour.
ReplyDeleteOnce again you continue to "WOW" us at Christmas! YOU are amazing...The 'Martha Stewart' of Christmas!!!! Wishing you a wonderful holiday season and all the best!
ReplyDeleteP
So much to see ... how beautiful. Now I have to go sit down with a cup of tea since the tour has exhausted me (LOL)!
ReplyDeleteI want to live in your house at Christmas!! You are a decorating DIVA ! Do you give lessons on shopping thrifty? You are fantastic! A very Merry Christmas to you and your family!
ReplyDeleteYour home is beautiful and your trees are amazing. I would not be able to stay focused on just one theme. How do you do it?
ReplyDeleteYou are incredibly talented. I thoroughly enjoyed the Christmas tour. Thank you for sharing. My one questions, and one I hope you expel on after the Holidays.
ReplyDeleteHOW/WHERE do your store all of this?
k
This is stunning and so inspiring to see what can be done with simple, inexpensive items combined in such a creative way!
ReplyDeleteI am amazed that your kitty, Hallie, leaves everything alone! Our bad cats would be batting the ornaments and decorations and making "nests" in the cute wicker baskets and galvanized tubs! Ah well...I can live vicariously... :-)
As with the past few years I've been following your blog, I am envious of all your Christmas decor and amazed at how you think up ways to repurpose things. Thank you for the tour!
ReplyDeleteJust stunning!!! Your love of the season shines through your designs. I will incorporate some of your ideas in the future. Thanks for the tour of your festive home!
ReplyDeleteI love the tour. I kept wondering as I walked through where you store all this throughout the year. It would fill our house. You are blessed with such a large beautiful house and family. LeeAnna
ReplyDeleteExactly what I wonder! Without a basement or attic for storage here, I can't imagine how to store so much - but it is amazingly beautiful! And, I must confess, I am simply not organized enough to keep everything sorted out.
DeleteIt not Christmas until I get to see a tour of your beautiful home dressed up for the holidays. Thanks!
DeleteBeautiful! Beautiful! Beautiful!
ReplyDeleteSome great inspiration for next year for me!
you are amazing, your home and decorations are amazing. I can't image where you store all of the decorations after the holidays....but you do have a big home and a big heart. Sew many ideas....Merry Christmas to you and your family..God Bless..
ReplyDeleteI love your site. And really love this years Christmas Home tour. I can't help wondering though, if you have an extra house to store all these beautiful things in until next year. lol
ReplyDeleteAmazing! I love seeing how you decorate each Christmas.
ReplyDeleteStunning and beautiful, wonderful, practical ideas!
ReplyDeleteBeautiful. Thanks for the tour.
ReplyDeleteThank you for sharing your home and ideas with us! It's a beautiful Christmas wonderland!
ReplyDeleteAbsolutely gorgeous! I gotta know, how many storage boxes do you have of Christmas decorations?
ReplyDeleteLoved the tour. Your creative imagination is wonderful to behold. Thank you and Merry Christmas.
ReplyDeleteThis is simply stunning. The creativity and attention to detail are amazing. I would love to see in your posts how long it takes you to accomplish all this and, if you do things all year round, some project posts about some of these gorgeous things. Describing how your "eye" works to make these things is something I've enjoyed in this and in your past posts. Not all of us see a black garland with bats on it and think of using it the way you do. You have a gift.
ReplyDeleteThoroughly enjoyed touring your Christmas home, Karen! Thank you for sharing it with us! Every room is spectacular and a true feast for the eyes. Merry Christmas to you and your family!
ReplyDeleteMGM
As always, my favorite blog post of the year! Sew much inspiration and delight. Thank you for sharing. Merry Christmas🎄🎄🎄🎄🎄🎄
ReplyDeleteThis is absolutely amazing! Every room is gorgeous. I'd love to know how long it takes you to decorate?
ReplyDeleteeVERYTHING IS BEAUTIFUL!! INCLUDING YOU FAMILY!!MERRY CHRISTMAS!
ReplyDeleteKaren, everything is amazing. You are truly a wonder and I'm thankful that you share so much with us. My wish for you and your family is a Blessed Christmas and a happy, healthy 2016.
ReplyDeleteWonderful of course! Its funny the array of emotions I experienced during the tour... amazement, joy, excitement, amazement, disbelief, wonder, encouragement, a little jealousy (but that disapated quickly, thank goodness), pleasure, and more amazement! Thanks so much for sharing your wonderful talents! Merry Christmas!!
ReplyDeleteWow! I thought I did a lot of decorating, but then my house is much smaller than yours. I loved the tour and thought everything was splendid. Tastefully and beautifully done Thank you for sharing it. Have a very Merry Christmas!
ReplyDeleteI want to come and live at your house. Or you can come live at mine! I cannot get organized to save my life. I hope things are well for you and your family. I think of you often and keep you in our prayers. You are my Martha Stewart! Merry Christmas if I don't catch you before next week. Hugs, Vicki Richardson stardesertnight@yahoo.com
ReplyDeleteI always look forward to your home tour!! Another stunning Christmas tour.
ReplyDeleteAll I can say is WOW!!!! Merry Christmas and a Very Happy, healthy New Year!!
Janie
It is official, I've been to Karen's and Christmas is beautiful. Thanks, Merry Christmas to you all.
ReplyDeleteAbsolutely beautiful! Stunning! Breathtaking attention to detail. What a lovely home and your work is exquisite! Thank you for sharing.
ReplyDeleteOh, my! I don't have space for all those beautiful trees and decorations, nor the space to store them so I'm a little jealous! You have done a magnificent job! Thanks for all the photos.
ReplyDeleteBeautiful! How long does it take you to decorate and how long do you leave the decorations up? You must just smile every time you walk into a room! Thanks for sharing!
ReplyDeleteWow, wow, wow AND wow!!! Your house is absolutely magical!
ReplyDeleteStunning!!! And so so so festive and magical and did I mention stunning??
ReplyDeleteThank you so much for sharing this with us!
Your entire home is just gorgeous...each room made me smile :)
ReplyDeleteThanks so much for sharing with us!
Karen
Amazing. Simply amazing!
ReplyDeleteLove your blog and your creative ideas.
-Mary Alice
I remember being amazed after your Christmas tour last year. Insane, in the best possible way! I just love how you go all out and I was grinning as I was scrolling. :)
ReplyDeleteWow, what a lot of great ideas, yet again, from your creative mind and willing fingers! Love all the plaid and burlap and rustic touches. The Minnie tree is so cute. Your girlie will love it. Merry merry Christmas!
ReplyDeleteMerry Christmas!! I loved the tour and enjoyed lingering over each and every photo! You are so creative! I love your home and all the decorations! Thank you for sharing your joy for Christmas with us!
ReplyDeleteI have been anticipating your Christmas Home tour. I am always amazed at your design vision. You inspire me!
ReplyDeleteWhat a delight! Thanks so much for sharing your lovely decorated home. Merry Christmas!!!
ReplyDeleteWow - Your Christmas decorations always blow me away. You are so creative. You can see items and use them for another purpose and make me think that was what they were really meant for in the first place.
ReplyDeleteI look forward to seeing what you come up with on every post.
I am so glad I found this post today. I have not had much computer time lately but loved seeing all the pictures of your house.
Amazing as always, Karen. I do love your Christmas tour so much. I am in wonder at all the work you do, you must be exhausted once you finish! I hope you and your family had an amazing Christmas and I wish you all the best for 2016! (you are probably out buying all the Christmas sale stuff right now!) x x
ReplyDeleteYour Christmas decorating is just breathtaking. Loved looking at all your creations. Beautiful!!
ReplyDeleteHow long does it take to put this all up and how long do you leave it up? I can't even imagine having this much stuff for Christmas. I have trouble just getting one tree up and decorated!
ReplyDeleteIncredible! You are so clever. Can't wait to use some of these ideas this year. Thank you so much for sharing.
ReplyDeleteKaren, I hope all is well with you and your family and am looking forward to you resuming your blogging...miss you!
ReplyDelete