Sometimes when you can't find exactly what you're looking for, a little transformation of one thing can lead to just what you need! I found tab top curtains at Ikea for $19.00 for TWO panels!! Yes, you read that correctly. Two panels per package for $19…unheard of these days.
I wasn't looking for tab top curtains, but the color was perfect and the 98 inch length was the yardage I needed. So, this is what I turned them into with just 2 straight lines of stitching…
Pop in to see how easy…
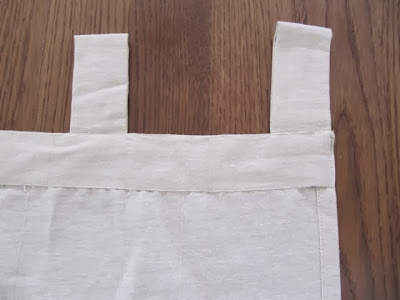
These are the tab top curtains.
First way to sew them "without" the ruffle at the top
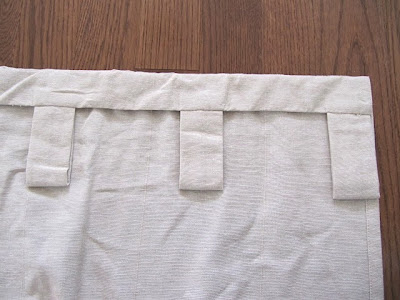
To transform the tab top to back tab curtains, just lay the curtains with the wrong side facing up.
Fold over each tab…
and pin the end of the each tab down. Sew all the way across the curtain, catching each tab end in the stitching.
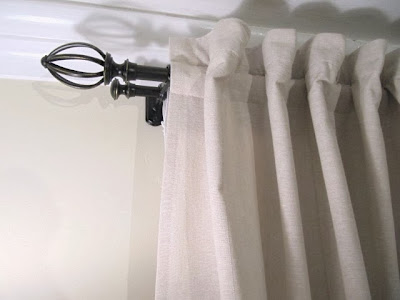
This will create a loop for the curtain rod, but there won't be a ruffle at the top. It will lay flat on the rod.
This is the back with the rod in, if I had sewn the tabs down.
Second way to sew them "with" a ruffle at the top
To get a classic ruffle look without a lot of fabric gathering, you will need to sew 2 lines of stitching.
Still fold over the tab, but pin in 2 spots.
Stitch the bottom of the tabs again as before and then stitch another line depending on how wide your curtain rods is.
Third way to hem the curtains from the top and make the ruffle!
These next pictures are the actual way I sewed mine. To avoid hemming the bottom up 2 inches, I turned down the top 2 inches on the original stitch line shown by the arrow.
This was a coincidence that I needed to hem them 2 inches and the casing was 2 inches. If you need to hem your curtains too, just fold down what you need to shorten at the bottom.
I pinned all the way across on the edge (top arrow) and also pinned each tab down (bottom arrow).
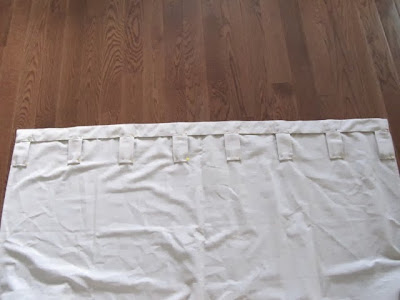
Here is the whole panel pinned.
First, I sewed the line of stitching on the right. I just followed the manufacturer's stitching.
Then I sewed another continuous line of stitching, 2 inches apart from that, catching the tabs. My rods are narrow, so adjust the width for your rods.
Then here again with part of the rod through the back tabs, so you can see what it looks like.
Finished in just minutes!!
I chose the curtains in the same color family as the walls, because I change the decorations throughout the house with the colors of the seasons and holidays. It makes it fun and easy to add inexpensive splashes of color with accessories and have the walls and curtains as a neutral backdrop.
When I'm all done, I show you the finished rooms.
Hope you enjoyed this post…one more reason to visit Ikea...$20 curtains and the meatballs, gravy and lingonberry sauce!!
Take care,
~Karen~


I love these curtains WAY better without tabs! Brilliant!
ReplyDeleteP
Fantastic and easy remake! Love the curtains.
ReplyDeleteBrilliant!
ReplyDeleteyou are so smart. love it!
ReplyDeleteWhat a great find.
ReplyDeleteThank you for the very clear tutorial. ;)
Rose
You are nothing short of brilliant!
ReplyDeleteYou clever girl!!!!! Thanks for sharing.
ReplyDeleteWOW! Very clever!!
ReplyDeleteThanks for this - it comes at just the right time. We're repainting and recarpeting the boys' rooms - all three have flown the nest. I have curtains for one of the rooms but want new ones for the other two. Now I know where to get them and how to make them special.
ReplyDeleteTruly brilliant! I'm in need of some new curtains and you've opened up a whole world of possibilities. Thank you so much!
ReplyDeleteWhat a FABULOUS idea! Thanks sew much!
ReplyDeleteVery clever idea~
ReplyDeleteAnother idea to add to my IKEA list. Just a thought...maybe you could add an IKEA IDEAS section to your header for easy reference. (As if you didn't already do enough for us.) Thanks for all you do.
ReplyDeleteHappy Sewing!
Nancy
Great idea. You are so clever.Love following your posts.
ReplyDeleteThis is a great way to change up the tab top curtains! And you can't beat the price!
ReplyDeleteI am new to sewing, quilting, all of it. I have so much to learn but i always did have an eye for decorating; yes i am a little OCD. However the other day i posted something and i didn't get a couple of nice replies back which was upsetting because i am trying and we all started from somewhere? Anyways, you have an artistic ability that i could only dream of having half of ever having
ReplyDeleteI am new to sewing, quilting, all of it. I have so much to learn but i always did have an eye for decorating; yes i am a little OCD. However the other day i posted something and i didn't get a couple of nice replies back which was upsetting because i am trying and we all started from somewhere? Anyways, you have an artistic ability that i could only dream of having half of ever having
ReplyDeleteKaren, as always you have a clever and easy solution for us! Thank you!
ReplyDeleteVal
artsybuildinglady.blogspot.ca
I also love IKEA for cheap curtains and frozen Salmon
ReplyDeleteThank you for this article. I have also thought to give more body to the curtains. But I wonder if you close the evening and in this case, they slide well on the rod? I sewed a button in every way to better before they close. (my English is not good, I am using a translator, and I hope my question is understandable) Thanks for your reply and congratulations for the choice you made!
ReplyDeleteThank you SO much for sharing this technique! It is exactly what I am needing to fix some curtain panels that I bought a few years ago and have never used. This will be perfect. You rock!
ReplyDeleteThanks for this great post...have been eyeing some new curtains that only came in tab top...this makes it so easy...
ReplyDeleteBrilliant! And so easy to do! I've linked to your tutorial over at Craft Gossip:
ReplyDeletehttp://sewing.craftgossip.com/tutorial-turn-tab-topped-curtains-into-hidden-back-tab-curtains/2013/11/13/
--Anne
Sorry to repeat all of the other comments but this is truly brilliant and so doable. Your photos and easy to follow instructions are excellent. Thank you for the inspiration! ~Thea
ReplyDeleteI wish my little brain could see half of what you see! You've got great ideas. Thanks for sharing.
ReplyDeleteLike your monogamous, simple, simple ...
ReplyDelete——Love life, love art, beautiful curtains in ogotohome
Lovely sewing work! I like how that guide seems so easy to follow, thanks to you. I totally agree with the commenters above that some curtains just look way more gorgeous without those tabs. Thanks for sharing your crafts!
ReplyDeleteBob Ward @ Allure Window Treatments