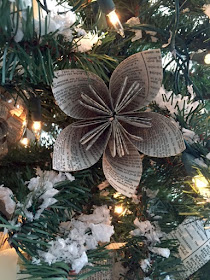
I also wanted to make a whole tree made with book page ornaments and handmade things to go with the wreath. Here's my attempt at a book page flower and I love them!!
Here it is nestled in the tree!!
Pop in to see the full tutorial...
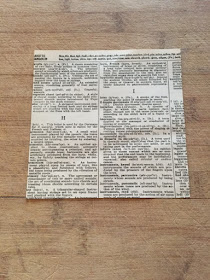
You can make them any size you want, but I started with a piece of paper cut to 5 inches square.
You can use...
- old books
- newspaper
- scrapbook paper
- magazines
Fold up one corner point to make a triangle.
Fold over the right point up to the top.
Fold over the left point to the top.
Now take the top right point and fold it over, towards the right even with the side. Make a nice crease.
Do the same for the left. Rub the folds to make a crease, because you'll need the crease lines as a guide in the next step.
Now, here's the part where it's hard for me to explain this in words vs making a video...
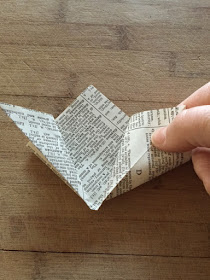
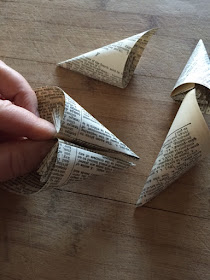
Take the right flap that you just folded over. Open it up with your pointer finger so that the side fold is now in the middle.
Like this...
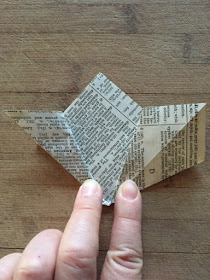
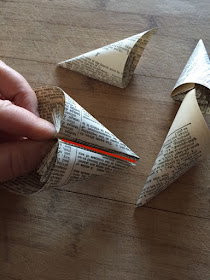
Flatten it out. It will look like a kite.
I marked this photo in red.
The side fold or crease will open up to be in the center.
Now do the same for the left.
Next, fold over the top of the "kite" so it's even with the sides.
Do that on both sides.
Now take the sides and fold it over towards the center.
On both sides.
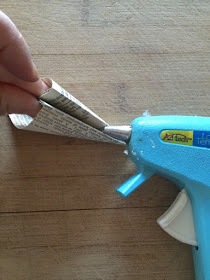
Next, "curl" up both sides to meet. Don't crease this part.
You want it rounded like a flower petal.
Hot glue the sides together.
You want to use hot glue, because it dries in seconds and you can keep moving with each step.
(I use low temp glue sticks, better on my fingers)
Here is the final petal.
You need 5 petals for each flower.
I know that seemed complicated, but you can literally make these petals in a minute once you get the steps down.
Now take each petal and hot glue them together down the sides.
Here's a red line where the glue should go.
Just keep adding the petals
Perfect!
Kind of looks like a poinsettia.
I just tucked mine inside the tree.
I'll show how to make these ornaments next!
You can also add a button, pearl or bead to the center of the flower if you want. I left my blank.
I made mine from an old dictionary, but these would look great made with all those wonderful scrapbook papers to add a pop of color.
Ohh, those glitter papers would be so pretty!!
Ohh, maybe add some glitter glue to the edges of these flowers for a little sparkle! The options are endless
I made an old fashioned paper chain too!
Back to making more flowers!!
Thanks for stopping by,
~Karen~












How lovely Christmas must be in your home - I can totally see this decor in a library or bookstore, too. A holiday haven for readers definitely! It's brilliant!
ReplyDeleteHello Karen, These are so pretty! I want to try this to add a new element to my living room tree this year. Thanks so much for sharing your talent with us. I am one of your newest followers and really enjoy your blog.
ReplyDeleteTake Care and have a great day.
Karen
I really like this...thank you for teaching the how to!
ReplyDeleteThis is gorgeous, thank you for sharing.......
ReplyDeleteWow I love the outcome! And this project is thrifty!
ReplyDeleteMommy Rockin' In Style
So pretty! looking nice :)
ReplyDeleteHi !
ReplyDeleteMy tree will also have his paper flowers !! Thanks for that great idea and nice tutorial ! (hope my english is not too bad....)
Hi Karen !
ReplyDeleteMy tree will also have his paper flowers, thanks for that great idea and for the nice tutorial ! (hope my english is not too bad....)
This is a great idea. I think I may try it out this year. It is much better for the environment then continuing to buy ornaments all the time. I like to change it up each year and this is a good alternative to me going out and buying new stuff. I may try spary painting the flowers with some glitter paint also.
ReplyDeleteWow! You are amazing with the flower tutorial. These are definitely going on my TO DO list for Christmas tree decor. And I love the book page paper chain, oh and your book page wreath is a must try too. Thank you for the inspiration!
ReplyDelete