I have been sewing a lot though, using up my stash and making things to hopefully sell in my Etsy shop. It's nice to be back at my machine...blogging just took a back seat.
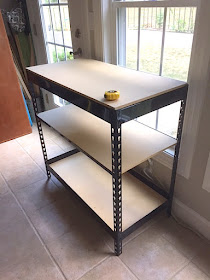
During one of my cleaning out sessions in the basement, I noticed my dad's old workbench system that I was using for Christmas storage. He hasn't used it in years due to his health. I thought to myself..."Why is this great set down here in the basement. I need to bring this up to my sewing room!!"
Tah Dah!!!
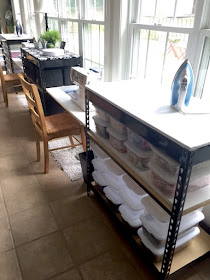
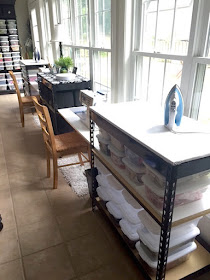
A double sewing machine, ironing station with storage.
I keep light colored thread in one machine and dark in the other, so it's always set up for those last minute clothing fixes, sewing projects or a day quilting with a friend...right Tina?
I know this system isn't for everyone, but pop in for some ideas to incorporate in your sewing room.
There are so many different shelving units out there in hardware stores, I'm sure there is one that will fit your needs.
This system is older, but I know they still make some similar. He bought his at Home Depot.
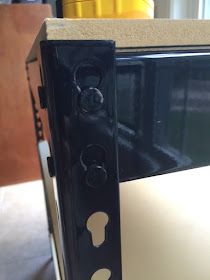
I love this system, because there are no tools required for assembly. They just pop together with this key hole system. The holes are also great to hang scissors on or other sewing tools and rulers.
The height of the shelves are adjustable, which is what I need for a lower height table for my machine. I like my machine at 24 inches high for how tall I am (5' 3") and the chairs that I use.
I went to the hardware store to buy a 3/4" thick MDF plank, but saw these pre-laminated shelving boards that were the exact width and length I needed to slide between each shelf.
The shelves on the workbench are screwed in from underneath, so you can either screw these new boards to that or clamp them to the existing shelves.
I bought 2- 8 foot lengths and had them meet (and attach) in the middle of the unit. This is super sturdy for me.
I have about 3 feet between each unit, so if you feel you need a little support under your machine, you can add a support leg in the center under your machine.too.
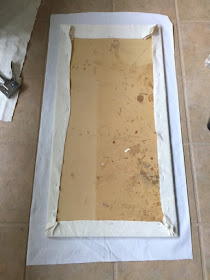
The top MDF shelf boards that came with the unit are perfect for ironing boards!!
A little batting...(I told you this was a workbench. I used the clean side to iron with, lol)
Staple gun in place.
Then cover the batting with the fabric of your choice. Staple gun again.
I know I will regret the white, but it's all I had for fabric and it looks so pretty.
I zip tied a surge bar to the leg of the unit for a lamp and the iron plugs.
I have always done this in all my sewing rooms. If the lamp is on, so is the iron.
You will never leave an iron on again.
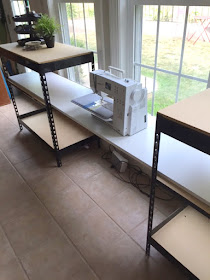
Here is the unit all put together...
One sewing machine and ironing center on one side with lots of storage for my fabric scraps and other projects underneath.
The board between the units in the perfect height for my back!!
The center unit has more storage with my daughters' old college dorm storage cubes on the bottom shelf. I have since put my little tv on top too.
Then the second machine and ironing center just waiting for a friend!
I hope you can take some of theses ideas and use them in your space too.
I was also thinking, if you had two taller shelves, you could put one board between them for your machine and the height of the extra shelves could hold a ton of fabric and crafting supplies. Vertical storage is the best!!
Thanks for stopping by,
~Karen~










You have all things in perfect order. Thanks for inspiring me to clean up my sewing space.
ReplyDeleteYou are a genius. Love this idea and on my way to Home Depot to pick 2 up. I am setting up a sewing room in my new house and this will be perfect. Thanks.
ReplyDeleteGood to see you back. You have given me an idea for a dresser as and Ironing board. I'll let you know when I post and link back to you. I said a prayer for you and your father, I have already been through that with my father. Even though it is a labor of love is so very stressful and draining.
ReplyDeleteBlessings to you and yours,
Tonia
Have missed you and glad to see you return. I so understand how life gets in the way and how a blogging Hiatus can recharge your personal batteries. Your ideas absolutely amaze me and want me to rip everything in my studio apart and start all over! Thank you for that. This is a wonderful set up. I do the same thing with sewing machines and sergers, light thread in one and dark in another. My friends think I am off the rails but it works so well for me. Thank you for posting this. I am in such a rut and I need a bump. Looking forward to more of your great ideas.
ReplyDeleteVery cool ideas! I have used a power strip for my lamp and iron, too. Works great!
ReplyDeleteThat's a great idea as always Karen and it works so well.
ReplyDeleteKaren, I love this idea! What a great way to store sewing supplies, and I love the desks for the sewing machines. I'm glad to see you back too.
ReplyDeleteThis is an awesome idea! That's definitely going on my idea board for my sewing room. Thanks for sharing.
ReplyDeleteI absolutely love what you did here. YOu have an amazing space and you use it really well. Making and ironing board out of that top piece is genius. I live in a very old house where the wiring in my sewing room is very sketchy so I can't use an iron. This means running and up and down a hundred times when I'm sewing. I'd love to have a wide surface like that for ironing instead of my old ironing board, but without a dedicated space to iron, I just can't do it. I'm impressed that you ran that board through the middle shelves for your sewing table. Really creative thinking!!
ReplyDeleteWow, Karen, that looks amazing! I have those same shelving units in our garage, but alas, they need to stay where they are. Just curious, how big is your sewing room? Looks like you have a lot of space and is a really great sized room.
ReplyDeleteSo good to see a post from you again! Your new sewing stations look great!
ReplyDelete"Sew", "sew" cute Karen. Glad to see you back.
ReplyDeleteGreat job on it!
ReplyDeleteLove the way you set up your sewing machines and your large bright space. Looks as if you are super organized. I am a little concerned that the steam from your iron may cause a problem with the mdf. I would seal it with polyurethane. I made a 4 X 8 foot cutting table and used mdf that I sealed with poly and I ironed on it for years making curtains. I held up great.
ReplyDeleteGreat tip, Anna, thx!
Deletewhat a great set-up! And it is so much fun to sew with a friend!
ReplyDeleteWhat a terrific use of that wall of light. 2 machines up all the time is a wonderful idea.
ReplyDeleteLove your new space - wish I could get organised (?)
ReplyDeleteJudy
You always have fabulous ideas! Thank you for sharing them. Glad to see a post from you. Yours is one of my absolute favorite blogs that I follow.
ReplyDeleteSandy N
explabgirl(at)yahoo.com
hi karen...terrific ideas...have given me some ideas to get organized...thank you for sharing your "new" craft center...take care...sally
ReplyDeleteLove this post. I am a bit lazier than you - I secured surge protector up high so I wouldn't have to bend over...
ReplyDeleteI love this. Thank you for the idea.
ReplyDeletei always enjoy your posts and always learn something. also, i have one demented 93 year old and one who is just a little 'afflicted', only one lives with me...i'm reworking my portion of the house and you've given me a lot to think about. thanks, friend.
ReplyDeleteI just rearranged my guest/sewing room so that I can (I think I can) put up both my serger and sewing machine. We live in a small rambler, so no room has the space of your sewing room. Most spaces have to do double duty; however, it was fun to see what you have done. I took your file cabinet idea and did the hanging the fabric from hanging files, but mine are in Sterilite crates that stack. I look forward to using more ideas in the future,
ReplyDeleteI LOVE it, LOVE IT!! I wish I had that much room in "my room". I acquired a second machine this year and have mine set up with light and dark thread too. Mine set side by side on a 6 ft table. I'd like to see your room in a week or so before you de-clutter from a project. You DO create clutter, don't you? LOL Please say it's not just me!
ReplyDeletexx, Carol
PS: Glad you are back.
Wonderful work!!!
ReplyDeleteThis is a great idea! Would definitely solve my issue with were to put my ironing along with having storage as well. A all-in-one. Thanks for sharing.
ReplyDeleteKaren I love the idea of zip tying the surge protector to the leg - brilliant! blessings, marlene
ReplyDeleteHey Karen - so glad you're back - I love your new set up. I have used so many of your ideas in my own sewing room which is a quarter of the size of yours but still you've helped me to organize "sew many ways"! I especially find your light and iron hookup to the power bar is a great help to me. When I go into a hardware store I never look at things the same now. Thanks for all your awesome ideas!
ReplyDeleteYes! Busy summer indeed, and Im sorry to hear about your dad's poor health. But that shelving, yes, perfect for big projects (as sewing always turns out to be, at least for me!~)
ReplyDeleteYou have made my wheels start turning! I happen to have two of the taller versions of these shelves.... One more and I can set up both of my machines in a much better configuration than they are currently. Hhhmmmmm
ReplyDeleteHi Karen,
ReplyDeleteI am always impressed with your organizational ideas! This is great! The light being on with the iron is so clever too.
Linda
mysewwhatblog
that's really clever and it looks like a great workspace
ReplyDeleteExcellent use of the shelving unit, I just made a cutting/ironing station and I love it. Save may back, knees and feet. Your table looks great.
ReplyDeletePlease be aware that surge protectors can cause fires. Had a surge protector that caused a fire. Was not fun. The fire chief that worked my fire, said that surge protectors cause more fires and most people do not know. As for your room - WOW. Really nice.
ReplyDeleteHi, I absolutely LOVE the way you made your tables, I love all the patterns on your site.
ReplyDeleteI have been trying to find the instructions for the ABC quilt or is it a wall pane?
Please help, I would love to make this for my grandson, in preschool. Thank you so much!! Pat Bigbie
I love your ideas! I live in my sons one room guest house and have very limited space. I have an embroidery machine, a server, and a sewing machine. I have to keep my ironing board up all the time. But I am going to try to incorporate some of your ideas. And yes, I barely have room for my bed!! Lol
ReplyDeleteLife gets crazy busy, and we all know it. I think I speak for many others and hope that all is well with your family, as it has been a long time since there has been any news or tips. Take care....from Iowa.
ReplyDeleteWow, what a wonderful idea, Karen! I am just a wee bit jealous....well, no, I'm a whole lot jealous of your big space! I've always enjoyed seeing your space and reading some of the clever ideas you share.
ReplyDelete