One of my clips boards is just about the 12 Christmas trees I put up in each room...what tree goes where and what the theme will be on each. I have been decorating multiple Christmas trees for most of my 27 married years, so I reuse old things I have in different ways. I also buy things at the end of the year or at clearance sales and that always inspires a new tree theme.
This year I was inspire by this basket I bought on sale at Michael's Craft store. I just love the red sweater fabric and the Scandinavian look. I already had the gray felt and red burlap, so a new tree is born.
Here are some of the things I made already for ornaments on the tree...
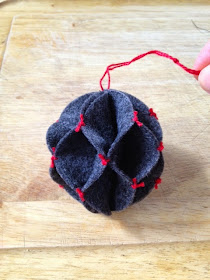
This little ornament is so cute and easy to make. You can either sew it or hot glue it.
Easy step by step picture instructions too...
Here's how to start…
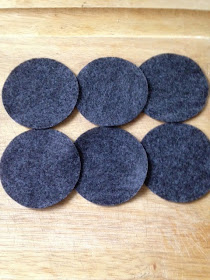
You will need 6 circles of felt. Theses are 3 inches wide across the center, but any size will work.
You can either trace something…
or use your die cutter if you have one.
Stack all 6 circles on top of each other.
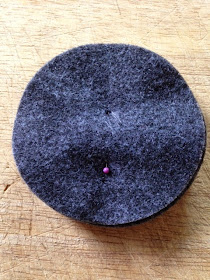
Fold the last one in half to find the center.
Place that last one on and pin on the center line.
Now sew along that center line.
You can hand sew these down the center with an embroidery floss too.
I machine stitched all my centers, but hand sewed the rest of the steps.
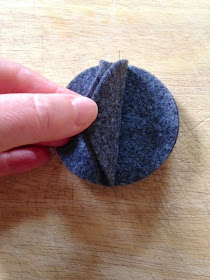
Now take one left flap and one right flap…
and bring them up together.
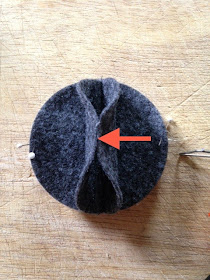
I marked the center with a pin, so you could see where they need to be connected.
You can either hand whip the edge the center with a few stitches or a dab of hot glue would be quick too.
**** You are NOT attaching the whole flap, just a few stitches on the edge to secure.
Here's a red arrow to show you where with out the pin.
Now do that for all the other pieces. You should have 6 of theses little things that look like cannolis. lol
Here are 2 of the sewn center sections I marked in red.
Next, take your fingers and pinch together the bottom sections from each of the left and right sewn sets
Do the same for the top.
I marked those new attached areas in green.
Do this all the way around.
This will be much clearer when you have your own ornament in your hand to see it in person.
This is how I stitched mine…
I used red embroidery floss and just tied a double knot for all the intersections.
Here are all the centers.
This is a picture of a hot glued one and a whipped stitched one with black thread.
I hot glued red beads on for accents.
I think stitching it with a contrasting thread is quicker, but totally up to you.
This is another work in progress project…Yarn Ball Garland
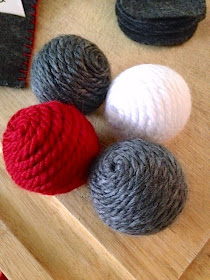
I bought these styrofoam balls at the dollar store last year and knew I would use them for something!
I am going to cover them all with yarn and then string them together for a garland.
I found that good old liquid school glue worked best.
Just squirt on the glue over half the ball and coil the yarn around.
More glue on the last bit and finish coiling the yarn. When the yarn is all on, place the ball in the palm of your hand and with your other hand give it a gentile squeeze (like you're making a meatball) to compress all the yarn into the glue.
You can just wrap the yarn around it like it was a true ball of yarn look too.
Attach string or ribbon to make ornaments or use a long sewing needle to string them into a garland.
This is a little letter to Santa envelope ornament.
I'll share this in a separate tutorial.
Thanks for stopping by,
~Karen~














I dunno, Karen, it's not been Thanksgiving yet, I'm pretty sure it's illegal to start making Christmas decorations before then. :)
ReplyDeleteP.S. Very clever idea - I'd love to see a garland of these. Not just for Christmas but in rainbow colours for every day.
I love your Christmas decorations, thanks for sharing, I think I'll try the bauble it looks fab
ReplyDeleteOh my! I LOVE this monochromatic, honeycomb version! Really elegant work.
ReplyDeleteAwesome - I will have to try the grey circle ball :)
ReplyDeleteI love the grey cannoli ball but do you seriously put up 12 trees in each room???
ReplyDeletei love those felt balls! I have the Olfa circle cutter and it will take no time at all to cut the circles. Thank you for this idea. and I must make the Santa envelope too.
ReplyDeleteOh those felt balls are pretty. I'm picturing them in white with red ties or red with white. Thanks for the tutorial for how to make them and the yarn balls too.
ReplyDeleteMy favorite line in this post is "like a meatball." ; )
ReplyDeleteSo... here's a semi-related question - do you recommend any particular glue gun? I have never used one but I'm going to purchase one. So many options...
ReplyDeleteThanks: I've pinned these for future use!
ReplyDeleteCute stuff!! I esp. like the envelope. It could be used to enclose a gift card, too!!
ReplyDeleteThanks for sharing. You always have the best of ideas.
ReplyDeleteSome really good ideas! Thank you!
ReplyDeletemuchas gracias por sus tutos,las ideas son fantasticas,saludos desde Barcelona Capital
ReplyDeleteThese are great ideas with not too much of fuss. Love them.
ReplyDeleteThese are so cute! I'll be making some of these before next year!
ReplyDelete