What is Number Generator, you ask? Well, it's a site where you would enter a range of numbers and ask it to "generate" a random number. I use this to pick a winner for blog give aways. For example, if I had 155 people leave comments for a blog give away, I would put the numbers 1-155 in the generator and ask it to "pick" a winner.
Here is a picture of the whole website page...it's good, but when you want to show the readers of your blog the actual winning number that was chosen, this is too large.
You want to just show them the box, circled in red below. Click on the picture to enlarge, but the three red marks show you where to put your numbers in and the click generate for the winning number.
The winning number is 76 in this example...
What we really want to see is the box isolated like this...
Isolating Tutorial...
On my Mac computer it is...
Command+Shift+3 will save a screenshot of your whole screen to your desktop.
Command+Shift+4 will give you a selection tool to select what part of your screen you want a picture of. It will save that selection to your desktop.
Here's the button (below) on your pc key board that will start the process...Push the Print Screen Button.
Next step (with your pc, not Mac) is to get the screen shot to an editor.
I use Paint. Go to...Start, All Programs, Accessories, then Paint...
In the upper left corner of Paint, click EDIT, then PASTE...
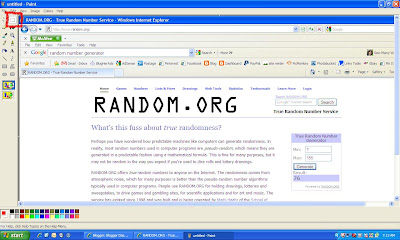
The screen shot will appear...like this.
Now, see that rectangle box in the upper left corner...I circled it in red. Click that and it will give you the SECTION feature.
The selection feature will look like a PLUS sign +.
Put it the upper left corner of the box I have circled below...drag and spread to the right as you are dragging down.
That will select just the box you want.
Now RIGHT CLICK in the selected box and click COPY TO...this will bring you to where ever you save your pictures to.
I know this looks like a lot, but seriously it takes 2 seconds...just a million words and pictures to write the tutorial. Don't let that scare you!!
Have a great day,
~Karen~


Thanks for sharing! This is how I do it too.
ReplyDeleteAnother very easy option....Skitch. Best app out there. =)
ReplyDeleteOoops...Link: http://skitch.com/
ReplyDeleteCould it be in your Downloads folder? Good luck, Mac still gets me confused sometimes too, even though I think it's better than PC.
ReplyDeleteHelpful as always Karen! Nice job!
ReplyDeleteMGM
YES!!!!!!!!!!!! Thank you Karen so much!! It works, now to copy and save your post for the future when I forget how to do this, LOL!! Thanks again for taking the time to write this post. I am very grateful.
ReplyDeleteI appreciate the keyboard shortcuts on capturing items. Thanks!
ReplyDeleteGood tip! I find this to be the easiest way to snag bits of a screenshot too. So nice of you to share it with others!
ReplyDeleteYour screenshot will probably be in your Documents folder. When you search in the Finder, make sure you click on "this iMac" so that it searches everywhere and not just in the Finder window you're in. Hope that helps. :o)
ReplyDeleteThe Screen Shot will be on your desktop.
ReplyDeleteApple + Shift + 4 = selection and it saves on your desktop as "Screen Shot Date" if you use 3 then it caps your whole screen.
If you use alt as well then it copies to your clipboard.
Good Luck!! :-)
Thank you Karen...I really love this tutorial. It's really helpful!!
ReplyDeleteAnother way to do it using Windows 7 and a PC:
ReplyDelete1. Use the generator to get your number.
2. Point to the image containing the generated number.
3. Right click.
4. Hover over "This Frame".
5. Highlight "Save Frame As...".
6. Name and place resulting image where you'll remember it, i.e., Desktop.
7. Insert image where desired.
Thanks Karen,
ReplyDeleteYou made this sound so easy, I just used your tutorial and it worked great.
Thanks so much for this tutorial! I just did my first giveaway, and yours was the best tutorial I've found!
ReplyDeletePeople like you who share their knowledge are gems. Thank you Karen!
ReplyDelete