
space
Now, onto Tool Time Tuesday...in the Plumbing Section!
space
How would you like to make this...and use it for
space
 space
spacethis...A Portable Quilt Design Wall. Woo Hoo!!! Finished size is 32" x 32".
space


The next few pictures are your list of ingredients and the price tag for each at the hardware store. I used 3/4" pipe for everything. Make sure you purchase all the parts that go together...meaning all 3/4". If you buy 1/2" pipe makes sure you buy 1/2" parts to match it.
space
This picture has 3 PVC pipes that are 10 feet long and 3/4" wide. For a design wall that is 32" x 32" you will need 2 of these 10 feet pipes. If you would like a smaller wall that would be 23" x 23", you will need 1 pipe that is 10 feet long. (I used these 3 pipes for another larger design wall, which I will be posting probably this weekend)
 space
spaceone 3/4" , 10 foot pipe is $1.62

Here are all the other parts you will need, which will be explained in detail below. You will also need a tape measure, pencil, hack saw and a rubber mallet.


You will need:

They are 30 cents each.

Next, you will need 2 -90 degree angled pieces that has a reducer on it. These will be your 2 bottom corners and support legs. I used the 3/4" that reduced it 1/2". You'll see why later.

These were $1.63 each.

These 2 are the parts that go with the above picture. They are called reducing male adapter (what a name!!! I hope you find it on your own and don't have to ask for it by name!!!) They reduce from 3/4" to 1/2".

These are 64 cents each.

These are little caps that just finish off the raw edge on the support feet. You will need 2.

3/4" cap at 32 cents each.

Ok...here we go. This is super easy, but looks long because I'm describing every step through pictures. These instructions are for the 32" x 32" design wall. (If you want the smaller 23" x 23" wall you will need one pipe and cut it into 6 equal parts at 20" for each piece...4 are for the sides and 2 for the legs. You will follow all the same directions below)

Have the super strong man in your life cut all the pieces for you. You can do it yourself too. I did the rest myself and it's pretty easy. Just start slow with the first movement of the saw, then have at it.

You can also put the pipe in a vice to hold it while you cut it...just don't squeeze the vice too hard on the pipe, just enough to hold it firm. I think you can also ask the hardware store to cut it for you.

This is what you will have:

This is a close up of the adapters for the lower corners. The 2 angles are smooth inside and the smaller one is threaded to screw in the adapter, which is where the legs will go in.

Just screw it in and hand tighten.

Place the lower corners so that the adapters are facing the back and place a 30" piece in the 2 corner pieces as seen below. If they are a little hard to insert, this is where you would use a rubber mallet to tap it in. Use mallet where ever needed...even to tap it apart.

Now add the left and right side (30") pieces into the 2 holes on the top part of the angle.

Take the last 30" piece and place the 2 -90 degree angle corner units on each end.

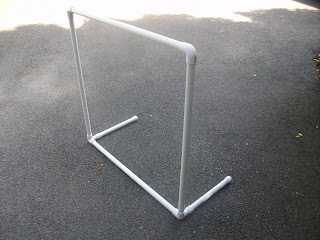
This is how it looks when assembled. See the adapters facing the back.

Place the 2 caps on the 12" leg pieces to finish off the raw edges. My husband had a great idea for the legs. I tried to make the legs short so they wouldn't stick out too far, but I was worried that it wouldn't keep it steady. He recommended using a funnel and filling the legs with rice when the cap is on, then place them back on the adapters. This way it will weight in down. If you are traveling with this design wall to your guild or retreat, buy 2 more caps to keep the rice inside the legs when you break down the design wall for packing.

Here is a close up of the leg together.

and here is the finished frame....easy peasy. and CHEAP, CHEAP, CHEAP. Total for pipes and corners is $9.02 plus tax from your state. That is a big WOO HOO. For the 23" x 23" design wall you would only need one pipe so that would be $7.40!! This doesn't include the flannel or felt that you would use to cover it. The fabric directions are next...see below.
Fabric Cover Directions:
Mine measured 64". Yours should be close, but it depends on how hard you tapped the pipes into the corner pieces.

Next, you need to measure the width all the way around the whole piece. Place tape measure around the middle and pull a little tight. You want it tight so the fabric will be taught around the frame.

The width of mine was 66 1/2".

This is the only math you have to do... take the width measurement, divide by 2 and add 1/2" seam allowance.
Slip over frame like a pillow case, with seams lined up the side pipes. If too loose, sew alittle more to tighten it up.

Here is your finished Portable Quilt Design Wall all set to go next to your sewing machine, cutting table or to your next quilt retreat.


This will help you see what blocks may look like in different configurations before you sew them together.


 space
space
Hope you have a great week,

Here are all the other parts you will need, which will be explained in detail below. You will also need a tape measure, pencil, hack saw and a rubber mallet.


You will need:
space
2 -90 degree elbow pieces for the top corners. Make sure they are smooth on the inside, not threaded.

They are 30 cents each.

Next, you will need 2 -90 degree angled pieces that has a reducer on it. These will be your 2 bottom corners and support legs. I used the 3/4" that reduced it 1/2". You'll see why later.

These were $1.63 each.

These 2 are the parts that go with the above picture. They are called reducing male adapter (what a name!!! I hope you find it on your own and don't have to ask for it by name!!!) They reduce from 3/4" to 1/2".

These are 64 cents each.

These are little caps that just finish off the raw edge on the support feet. You will need 2.

3/4" cap at 32 cents each.

Ok...here we go. This is super easy, but looks long because I'm describing every step through pictures. These instructions are for the 32" x 32" design wall. (If you want the smaller 23" x 23" wall you will need one pipe and cut it into 6 equal parts at 20" for each piece...4 are for the sides and 2 for the legs. You will follow all the same directions below)
space
First, take one of the 10 foot pipes and make four pencil marks at 30" each. That will give you the 4 sides. From the second pipe cut 2 pieces that are 12" long. Sorry I didn't take a picture of the 12" mark.

Have the super strong man in your life cut all the pieces for you. You can do it yourself too. I did the rest myself and it's pretty easy. Just start slow with the first movement of the saw, then have at it.

You can also put the pipe in a vice to hold it while you cut it...just don't squeeze the vice too hard on the pipe, just enough to hold it firm. I think you can also ask the hardware store to cut it for you.

This is what you will have:
4 pieces for the sides, top and bottom... 30" each
2 pieces for the legs 12" each
2 top corner angles
2 bottom corner angles with adapters in
2 bottom corner angles with adapters in
2 caps
This is a close up of the adapters for the lower corners. The 2 angles are smooth inside and the smaller one is threaded to screw in the adapter, which is where the legs will go in.

Just screw it in and hand tighten.

Place the lower corners so that the adapters are facing the back and place a 30" piece in the 2 corner pieces as seen below. If they are a little hard to insert, this is where you would use a rubber mallet to tap it in. Use mallet where ever needed...even to tap it apart.

Now add the left and right side (30") pieces into the 2 holes on the top part of the angle.

Take the last 30" piece and place the 2 -90 degree angle corner units on each end.

This is how it looks when assembled. See the adapters facing the back.

Place the 2 caps on the 12" leg pieces to finish off the raw edges. My husband had a great idea for the legs. I tried to make the legs short so they wouldn't stick out too far, but I was worried that it wouldn't keep it steady. He recommended using a funnel and filling the legs with rice when the cap is on, then place them back on the adapters. This way it will weight in down. If you are traveling with this design wall to your guild or retreat, buy 2 more caps to keep the rice inside the legs when you break down the design wall for packing.

Here is a close up of the leg together.

and here is the finished frame....easy peasy. and CHEAP, CHEAP, CHEAP. Total for pipes and corners is $9.02 plus tax from your state. That is a big WOO HOO. For the 23" x 23" design wall you would only need one pipe so that would be $7.40!! This doesn't include the flannel or felt that you would use to cover it. The fabric directions are next...see below.

Fabric Cover Directions:
space
You can use either flannel or felt. For this smaller one, I used flannel that I already had on my design wall and just cut it up. For the larger quilt design wall that I will show you this weekend, I used felt. Both are great for blocks to stick to, but you can always stick them up with pins too.
space
First, you need to measure the height of the pvc design wall. Below, I placed a tape measure over the top of the top pvc pipe. Hold the beginning of the tape on one side and measure the distance at the other side.

Mine measured 64". Yours should be close, but it depends on how hard you tapped the pipes into the corner pieces.

Next, you need to measure the width all the way around the whole piece. Place tape measure around the middle and pull a little tight. You want it tight so the fabric will be taught around the frame.

The width of mine was 66 1/2".

This is the only math you have to do... take the width measurement, divide by 2 and add 1/2" seam allowance.
space
here is my example:
space
66.5 divided by 2 = 33.25 + .5 = 33.75
or
66 1/2" divided by 2= 33 1/4" + 1/2" = 33 3/4"
space
So now you will cut a piece of fabric 64" long by 33 3/4" wide (if you get the same measurements as mine on your frame).
space
Fold fabric in half right sides together (I don't think there is a right or wrong side of the fabric, but oh well). The picture below shows the square of fabric with the fold at the top. Sew only the left and right sides with a 1/4" seam, leaving the bottom open. Turn right side out.

Slip over frame like a pillow case, with seams lined up the side pipes. If too loose, sew alittle more to tighten it up.

Here is your finished Portable Quilt Design Wall all set to go next to your sewing machine, cutting table or to your next quilt retreat.


This will help you see what blocks may look like in different configurations before you sew them together.


 space
spaceI really hope you like today's TTT and hope you can use it somewhere in your quilting world. You can make these in any size to fit your needs and they can always be taken apart for traveling (tap apart with the rubber mallet if it gets too tight).
spaceHere's a preview of the second part to this week's Tool Time Tuesday. I was going to add it to today's, but this post was already too long for you. This is the Mama Bear of quilt walls...it's 6 feet by 4 feet and is great to use for whole quilt designs and if you have the space for it. So stay tuned...
space
Hope you have a great week,
~Karen~
sapce
also coming soon...is maybe a little carry bag for all the parts so you can take it on the go!!


